
前言#
上篇文章中我们分析确认了分析顺序,没看过的可以去看下。
坏蛋Dan:vue/compiler-sfc源码分析学习1--如何调试
坏蛋Dan:vue/compiler-sfc源码分析学习--part1
坏蛋Dan:vue/compiler-sfc源码分析学习2--确认后续分析目标
请务必点个赞~

话不多说,我们直接看代码。
正文#
在开始调试前说下,由于代码量有些大(1500+行),所以这里分开来一块一块的分析,并且新开一个part,根据日期拆分,比如今天是day1。
入口#
回到node_modules\vue-loader\dist\select.js中,我们看到type === script时先是调用resolveScript_1.resolveScript处理descriptor之后才执行loader的回调。
    // script
    if (query.type === `script`) {
        const script = (0, resolveScript_1.resolveScript)(descriptor, scopeId, options, loaderContext);
        if (appendExtension) {
            loaderContext.resourcePath += '.' + (script.lang || 'js');
        }
        loaderContext.callback(null, script.content, script.map);
        return;
} 那么我们顺着这段代码进入node_modules\vue-loader\dist\resolveScript.js中找到resolveScript这个方法。
const compiler_sfc_1 = require("vue/compiler-sfc");
const clientCache = new WeakMap();
const serverCache = new WeakMap();
/**
 * inline template mode can only be enabled if:
 * - is production (separate compilation needed for HMR during dev)
 * - template has no pre-processor (separate loader chain required)
 * - template is not using src
 */
function canInlineTemplate(descriptor, isProd) {
    const templateLang = descriptor.template && descriptor.template.lang;
    const templateSrc = descriptor.template && descriptor.template.src;
    return isProd && !!descriptor.scriptSetup && !templateLang && !templateSrc;
}
exports.canInlineTemplate = canInlineTemplate;
function resolveScript(descriptor, scopeId, options, loaderContext) {
    var _a;
    if (!descriptor.script && !descriptor.scriptSetup) {
        return null;
    }
    const isProd = loaderContext.mode === 'production' || process.env.NODE_ENV === 'production';
    const isServer = (_a = options.isServerBuild) !== null && _a !== void 0 ? _a : loaderContext.target === 'node';
    const enableInline = canInlineTemplate(descriptor, isProd);
    const cacheToUse = isServer ? serverCache : clientCache;
    const cached = cacheToUse.get(descriptor);
    if (cached) {
        return cached;
    }
    let resolved = null;
    let templateCompiler;
    if (typeof options.compiler === 'string') {
        templateCompiler = require(options.compiler);
    }
    else {
        templateCompiler = options.compiler;
    }
    try {
        resolved = (0, compiler_sfc_1.compileScript)(descriptor, {
            id: scopeId,
            isProd,
            inlineTemplate: enableInline,
            reactivityTransform: options.reactivityTransform,
            babelParserPlugins: options.babelParserPlugins,
            templateOptions: {
                ssr: isServer,
                compiler: templateCompiler,
                compilerOptions: Object.assign(Object.assign({}, options.compilerOptions), (0, util_1.resolveTemplateTSOptions)(descriptor, options)),
                transformAssetUrls: options.transformAssetUrls || true,
            },
        });
    }
    catch (e) {
        loaderContext.emitError(e);
    }
    cacheToUse.set(descriptor, resolved);
    return resolved;
} 代码很简单,就是判断当前环境,然后将对应参数传入compiler_sfc_1.compileScript中也就是require(@vue/compiler-sfc).compileScript中。
切回我们的packages/compiler-sfc包中,找到index.ts,发现导出的compileScript是来自compileScript.ts的。
export { compileScript } from './compileScript' 选择测试单元#
在开始分析之前,我们需要确定测试单元,调试文件是compileScript.ts,那测试单元自然在compileScript.spec.ts文件中找。或者我们自己写一个,到时差了什么我们自己再加。
<template>
  <div @click="handleChangeColor" class="test">
    <Test :a="a" :b="b" />
    <input type="text" ref="input">
  </div>
</template>

<script setup>
import Test from "./Test.vue";
import { ref, reactive, defineProps, onMounted, onErrorCaptured  } from "vue";

const props = defineProps({
  e: String,
  f: {
    type: Array,
    default: () => [],
  },
});

const a = ref(0);

const colorList = reactive(['#000', '#f00', '#0f0', '#00f', '#fff'])

const color = colorList[0]

const b = reactive({
  c: 1,
  d: 2,
});

const input = ref(null);

function handleChangeColor () {
  const { random } = Math
  color.value = colorList(random() * 5)
}


onMounted(() => {
  a.value = 1;
  b.c = 2;
  b.d = 3;
  input.value.focus();
});

onErrorCaptured((err) => {
  console.log(err);
});
</script>

<style lang="scss" scoped>
.test {
  color: v-bind(color)
}
</style>然后进入src/compileScript.ts中打上断点。
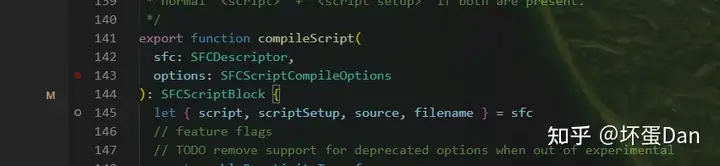
然后直接测试单元左上角debug
需要注意的一点是,如果你是自己手动调用的compileScript,请务必在调用之前先调用parse转换成descriptorSfcBlock,不然就会有问题。
export function compileSFCScript(
  src: string,
  options?: Partial<SFCScriptCompileOptions>,
  parseOptions?: SFCParseOptions
) {
  const { descriptor } = parse(src, parseOptions)
  return compileScript(descriptor, {
    ...options,
    id: mockId
  })
} jsx和typescript兼容处理#
  // ...省略
  // resolve parser plugins
  const plugins: ParserPlugin[] = []
  if (!isTS || scriptLang === 'tsx' || scriptSetupLang === 'tsx') {
    plugins.push('jsx')
  } else {
    // If don't match the case of adding jsx, should remove the jsx from the babelParserPlugins
    if (options.babelParserPlugins)
      options.babelParserPlugins = options.babelParserPlugins.filter(
        n => n !== 'jsx'
      )
  }
  if (options.babelParserPlugins) plugins.push(...options.babelParserPlugins)
  if (isTS) {
    plugins.push('typescript')
    if (!plugins.includes('decorators')) {
      plugins.push('decorators-legacy')
    }
} 这一段很简单,就是对jsx和ts环境的判断和插件支持。
处理非setup script#
注:以下说的setup script block都是说这种`` ,用了setup语法糖的。
实际上我们的test suite并不会执行这段代码,但是学习嘛,所以我又搞了个不带setup的test suite用来调试这段代码,我这里就不贴代码了,简单的vue2.x代码即可。
  if (!scriptSetup) {
    // ...省略
    try {
      let content = script.content
      let map = script.map
      const scriptAst = _parse(content, {
        plugins,
        sourceType: 'module'
      }).program
      const bindings = analyzeScriptBindings(scriptAst.body)
      if (enableReactivityTransform && shouldTransform(content)) {
        const s = new MagicString(source)
        const startOffset = script.loc.start.offset
        const endOffset = script.loc.end.offset
        const { importedHelpers } = transformAST(scriptAst, s, startOffset)
        if (importedHelpers.length) {
          s.prepend(
            `import { ${importedHelpers
              .map(h => `${h} as _${h}`)
              .join(', ')} } from 'vue'\n`
          )
        }
        s.remove(0, startOffset)
        s.remove(endOffset, source.length)
        content = s.toString()
        if (genSourceMap) {
          map = s.generateMap({
            source: filename,
            hires: true,
            includeContent: true
          }) as unknown as RawSourceMap
        }
      }
      if (cssVars.length) {
        content = rewriteDefault(content, DEFAULT_VAR, plugins)
        content += genNormalScriptCssVarsCode(
          cssVars,
          bindings,
          scopeId,
          isProd
        )
        content += `\nexport default ${DEFAULT_VAR}`
      }
      return {
        ...script,
        content,
        map,
        bindings,
        scriptAst: scriptAst.body
      }
    }
// ...省略error
这块代码量有点多,我们一点一点的分析。有些判断错误场景的就省略了,感兴趣的大佬可自行去看下。
什么情况下会执行这段代码?:不带有script setup块并且这个script块的lang要么不存在(vue2.x选项式写法或者3.x非语法糖写法)要么就只能是ts、tsx、jsx。
代码切割成一块一块来看下。
      let content = script.content
      let map = script.map
      const scriptAst = _parse(content, {
        plugins,
        sourceType: 'module'
}).program_parse[1]: 这个是babel的parse,我之前的文章里有介绍,感兴趣的大佬可以看下。 是用来将代码转换成ast的。
map: 是source map这里就不说了,因为不影响我们调试学习。
content: script的源码。
plugins: 就是指的上面的那些个ts、jsx、tsx以及如果你用了babel的plugins用来处理js,那这里肯定也是得加上的,为了防止你的js代码没有被babel处理到。
const bindings = analyzeScriptBindings(scriptAst.body)这行代码一看就是用来处理绑定的属性的,来看下analyzeScriptBindings的代码
analyzeScriptBindings
function analyzeScriptBindings(ast: Statement[]): BindingMetadata {
  for (const node of ast) {
    if (
      node.type === 'ExportDefaultDeclaration' &&
      node.declaration.type === 'ObjectExpression'
    ) {
      return analyzeBindingsFromOptions(node.declaration)
    }
  }
  return {}
} ExportDefaultDeclaration[2]: 匹配到export default关键词。
ObjectExpression[3]: 对象表达式,export default后面接的自然是{} ,也就是说export default声明的对象是它后面的这个对象。
来看下analyzeBindingsFromOptions的代码。整体是遍历这些node(节点),然后做对应处理。 代码又是有些长,还得切块。
function analyzeBindingsFromOptions(node: ObjectExpression): BindingMetadata {
  const bindings: BindingMetadata = {}
  // #3270, #3275
  // mark non-script-setup so we don't resolve components/directives from these
  Object.defineProperty(bindings, '__isScriptSetup', {
    enumerable: false,
    value: false
  })
  for (const property of node.properties) {
    // ...省略
  }

  return bindings
}
先来看下遍历中第一块代码
    if (
      property.type === 'ObjectProperty' &&
      !property.computed &&
      property.key.type === 'Identifier'
    ) {
      // props
      if (property.key.name === 'props') {
        // props: ['foo']
        // props: { foo: ... }
        for (const key of getObjectOrArrayExpressionKeys(property.value)) {
          bindings[key] = BindingTypes.PROPS
        }
      }

      // inject
      else if (property.key.name === 'inject') {
        // inject: ['foo']
        // inject: { foo: {} }
        for (const key of getObjectOrArrayExpressionKeys(property.value)) {
          bindings[key] = BindingTypes.OPTIONS
        }
      }

      // computed & methods
      else if (
        property.value.type === 'ObjectExpression' &&
        (property.key.name === 'computed' || property.key.name === 'methods')
      ) {
        // methods: { foo() {} }
        // computed: { foo() {} }
        for (const key of getObjectExpressionKeys(property.value)) {
          bindings[key] = BindingTypes.OPTIONS
        }
      }
}ObjectProperty[4]: 顾名思义,就是一个对象属性Identifier[5]: 这个属性的key的类型是一个标识符,key的name就是我们的inject、props、components等这些。getObjectOrArrayExpressionKeys: 这个就是用来处理对象格式或者是数组格式的值(比如props支持两种写法props: ['a', 'b']或者props: { a: String, b: String }),代码咱就不看了,后面看下数据即可。
methods和computed是必须接收一个对象,然后对象里都是方法才行。
接着看
    // setup & data
    else if (
      property.type === 'ObjectMethod' &&
      property.key.type === 'Identifier' &&
      (property.key.name === 'setup' || property.key.name === 'data')
    ) {
      for (const bodyItem of property.body.body) {
        // setup() {
        //   return {
        //     foo: null
        //   }
        // }
        if (
          bodyItem.type === 'ReturnStatement' &&
          bodyItem.argument &&
          bodyItem.argument.type === 'ObjectExpression'
        ) {
          for (const key of getObjectExpressionKeys(bodyItem.argument)) {
            bindings[key] =
              property.key.name === 'setup'
                ? BindingTypes.SETUP_MAYBE_REF
                : BindingTypes.DATA
          }
        }
      }
} ObjectMethod[6]:比如这种data () { return {} }。
其他就不多说了,我们直接来看下最终数据
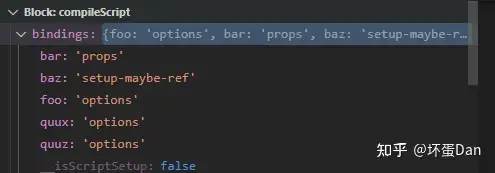
总结下analyzeBindingsFromOptions这个方法
简单的说就是在将你绑定的数据都转换成key-type的形式。
回到之前的代码
开启reactivityTransform
      if (enableReactivityTransform && shouldTransform(content)) {
        const s = new MagicString(source)
        const startOffset = script.loc.start.offset
        const endOffset = script.loc.end.offset
        const { importedHelpers } = transformAST(scriptAst, s, startOffset)
        if (importedHelpers.length) {
          s.prepend(
            `import { ${importedHelpers
              .map(h => `${h} as _${h}`)
              .join(', ')} } from 'vue'\n`
          )
        }
        s.remove(0, startOffset)
        s.remove(endOffset, source.length)
        content = s.toString()
        if (genSourceMap) {
          map = s.generateMap({
            source: filename,
            hires: true,
            includeContent: true
          }) as unknown as RawSourceMap
        }
}这块代码我们先不看了,放到下面一个小标题单独分析,简单的说就是抽取reactivity-transform里的api再转换成runtime想要的api,比如$ref变成import { ref as _ref } from 'vue',然后替换$ref为ref,然后xxx = value替换为xxx.value = value。
处理cssVars
      if (cssVars.length) {
        content = rewriteDefault(content, DEFAULT_VAR, plugins)
        content += genNormalScriptCssVarsCode(
          cssVars,
          bindings,
          scopeId,
          isProd
        )
        content += `\nexport default ${DEFAULT_VAR}`
}由于我们这个测试单元并没有cssVar,所以我们来加一下
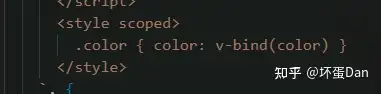
重新跑下

我们继续分析
DEFAULT_VAR:__default__。plugins: 前面提到过的,比如typescript、jsx、tsx或者babel带上的用于处理js等的插件名字。content: 被处理后的源码。rewriteDefault: 看名字猜测是用来处理default关键词的。代码有些长,就不看代码了,简单说一下,就是判断是否有export default关键词,然后转换为const __default__ = xxx,比如export default { a: 123 }会被转换为const __default__ = { a: 123 }。genNormalScriptCssVarsCode: 这个还是比较重要的,和css变量如何注入有关,不过只用于常规非setup的script``block,看下代码。
// <script setup> already gets the calls injected as part of the transform
// this is only for single normal <script>
export function genNormalScriptCssVarsCode(
  cssVars: string[],
  bindings: BindingMetadata,
  id: string,
  isProd: boolean
): string {
  return (
    `\nimport { ${CSS_VARS_HELPER} as _${CSS_VARS_HELPER} } from 'vue'\n` +
    `const __injectCSSVars__ = () => {\n${genCssVarsCode(
      cssVars,
      bindings,
      id,
      isProd
    )}}\n` +
    `const __setup__ = __default__.setup\n` +
    `__default__.setup = __setup__\n` +
    `  ? (props, ctx) => { __injectCSSVars__();return __setup__(props, ctx) }\n` +
    `  : __injectCSSVars__\n`
  )
} 这里说一下,一般一段可执行代码是字符串,那这段代码大概率就是一段runtime,需要在编译后执行的。
CSS_VARS_HELPER:useCssVars,是runtime辅助函数。 代码位置在@vue/runtime-dom/helper/cssVars.ts中,来看下代码。
 export function useCssVars(getter: (ctx: any) => Record<string, string>) {
  if (!__BROWSER__ && !__TEST__) return

  const instance = getCurrentInstance()
  /* istanbul ignore next */
  if (!instance) {
    __DEV__ &&
      warn(`useCssVars is called without current active component instance.`)
    return
  }

  const setVars = () =>
    setVarsOnVNode(instance.subTree, getter(instance.proxy!))
  watchPostEffect(setVars)
  onMounted(() => {
    const ob = new MutationObserver(setVars)
    ob.observe(instance.subTree.el!.parentNode, { childList: true })
    onUnmounted(() => ob.disconnect())
  })
}里面有挺多东西我们目前都不清楚是干啥的,但是这并不影响我们分析。大概意思就是创建VNode的时候将这些变量插入到vNode中,然后监听变化。
genCssVarsCode: 来看下代码,看下是如何处理的
export function genCssVarsCode(
  vars: string[],
  bindings: BindingMetadata,
  id: string,
  isProd: boolean
) {
  const varsExp = genCssVarsFromList(vars, id, isProd)
  const exp = createSimpleExpression(varsExp, false)
  const context = createTransformContext(createRoot([]), {
    prefixIdentifiers: true,
    inline: true,
    bindingMetadata: bindings.__isScriptSetup === false ? undefined : bindings
  })
  const transformed = processExpression(exp, context)
  const transformedString =
    transformed.type === NodeTypes.SIMPLE_EXPRESSION
      ? transformed.content
      : transformed.children
          .map(c => {
            return typeof c === 'string'
              ? c
              : (c as SimpleExpressionNode).content
          })
          .join('')

  return `_${CSS_VARS_HELPER}(_ctx => (${transformedString}))`
} genCssVarsFromList: 将css var变成js认识的东西。
export function genCssVarsFromList(
  vars: string[],
  id: string,
  isProd: boolean,
  isSSR = false
): string {
  return `{\n  ${vars
    .map(
      key => `"${isSSR ? `--` : ``}${genVarName(id, key, isProd)}": (${key})`
    )
    .join(',\n  ')}\n}`
}

function genVarName(id: string, raw: string, isProd: boolean): string {
  if (isProd) {
    return hash(id + raw)
  } else {
    return `${id}-${raw.replace(/([^\w-])/g, '_')}`
  }
} id: 自然就是scopedId
来看下数据,由于截图不好截,所以这里打印一下。
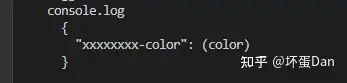
可以看到变成了一个对象格式的数据。
我们接着分析
createSimpleExpression: 从@vue/compiler-dom[7]中导入,前面也有提到过,这个包是用来将代码转换成ast的。代码就不看了,直接看下数据即可。
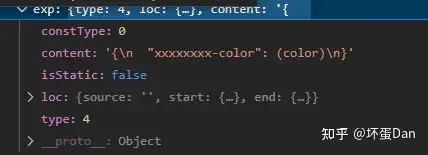
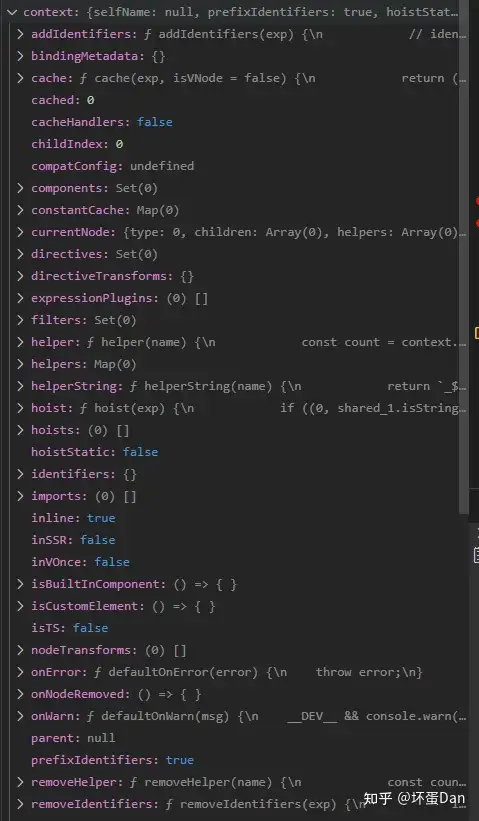
createRoot: 同上,创建编译对象。createTransformContext: 同上,编译的上下文环境, 直接看下数据。
processExpression: 同上,装换成能被js认识的ast(?)
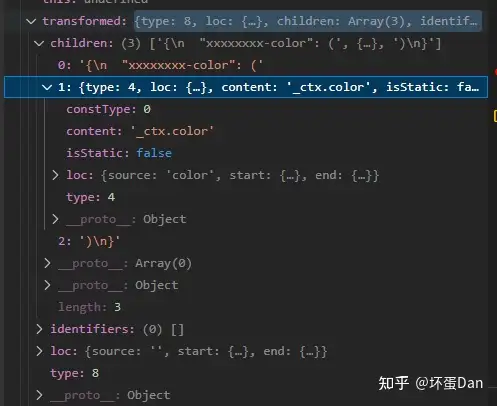
最终变成

最后返回runtime
_useCssVars(_ctx => (${transformedString})) 。
总结下genCssVarsCode
这个方法调用@vue/compiler-dom的方法,将css var变量转换为['${scopedId}-${var}']: context[var],其中context也就是组件实例上下文。最终返回一段runtime _useCssVars(_ctx => (${transformedString}))。
总结一下genNormalScriptCssVarsCode
这段runtime代码很简单,就是将cssVars转换成代码,然后注入到setup里面,毕竟是vue3.x的写法,所以只能是setup里才有效。 然后return这段runtime。 最终这段runtime会在组件实例创建的时候执行。
回到我们的处理cssVars这段代码
content += `\nexport default ${DEFAULT_VAR}`最后把js导出。
回到我们的处理非setup script代码中,最后将数据return出去。
      return {
        ...script,
        content,
        map,
        bindings,
        scriptAst: scriptAst.body
} 总结一下这段非setup script block的代码处理。
简单的说就四件事
- 将
source转换成ast - 判断是否开启
reactivity-transform,如果开启了就判断是否存在相关api,有就做替换处理,具体分析看上面 - 处理
css变量,装换成setup中的数据,然后存入runtime代码中注入到setup(这里的setup并不是指setup script block,而是当前script block自带的,没有自带的则setup就直接变成这段runtime)中,等组件实例创建时执行。 - 最后返回。
reactivityTransform#
这个是vue3.x的新特性,目前还在实验中,可以理解为是一种语法糖。
在看例子前,我们先回想下我们之前在写vue3代码时,是否会经常忘记ref处理后的数据赋值时需要用.value,然后直接赋值导致数据不正常改变。
我们来看下例子
例子:
<script setup>
let count = $ref(0)

console.log(count)

function increment() {
  count++
}
</script>$ref: 这个其实就是ref这个api,但你应该发现了count赋值并不需要count.value++。是的,这样就可以了。可以不用再别扭的写count.value这种语法。
这块代码会在compiler也就是编译的时候被转换成ref一样的代码。
类似的api还有
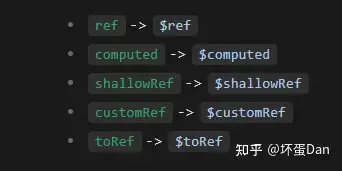
简单的说,就是提供一些新的api,这些api可以免去笨重的写法,它们会在编译过程中转换为相应的写法。
另外这些个api都是全局导入的(前提是开启了reactivity transform),当然你也可以从vue/macros中导入,这样会直观、好追踪些。
我们来改动下我们的代码,来看下这里面是怎么处理的。
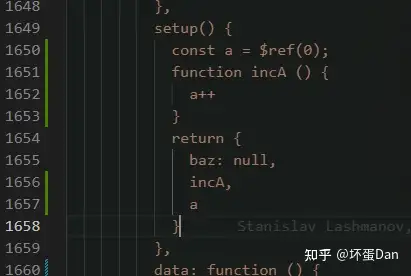
然后compile方法第二个参数options新增reactivityTransform: true
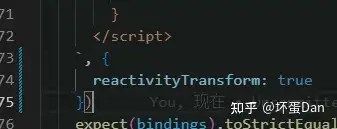
重新debug一下我们的demo,然后回到上面那个小标题的代码中。
import { shouldTransform, transformAST } from '@vue/reactivity-transform'

if (enableReactivityTransform && shouldTransform(content)) {
        const s = new MagicString(source)
        const startOffset = script.loc.start.offset
        const endOffset = script.loc.end.offset
        const { importedHelpers } = transformAST(scriptAst, s, startOffset)
        if (importedHelpers.length) {
          s.prepend(
            `import { ${importedHelpers
              .map(h => `${h} as _${h}`)
              .join(', ')} } from 'vue'\n`
          )
        }
        s.remove(0, startOffset)
        s.remove(endOffset, source.length)
        content = s.toString()
        if (genSourceMap) {
          map = s.generateMap({
            source: filename,
            hires: true,
            includeContent: true
          }) as unknown as RawSourceMap
        }
} @vue/reactivity-transform[9]: 这个就是处理这个新特性的核心包。后面有空会分析这个包。shouldTransform: 代码就不看了,就一个正则匹配$ref等。enableReactivityTransform:我们的options中设置的reactivityTransform为true这里就是true,虽然这个变量还有两个可用于判断的options字段,但是都是准备废弃的,我们就不多说了。MagicString[10]: 一个第三方轻量包,可用来处理源码并生成source map.s: 自然就是被处理后的源码.startOffset:type为script代码的起始位置。endOffset:type为script代码的结束位置。transformAST: 将代码转换成ast,从@vue/reactivity-transform中导入, 需要注意transformAST方法里面其实还做了一步操作,把xxx = value转换成xxx.value = value。importedHelpers: 这种一般都是辅助函数相关的,来看下数据。

总结一下reactivity-transform开启后做了什么
这一段其实很简单,就是判断是否开启了ractivity-transform并且带有$ref等这些用法,如果符合。先调用magic-string处理source转换为可操作的“源码”。然后调用@vue/reactivity-transform的transformAST找出目标api,然后导入这个api对应的原本的真实runtime api。比如$ref变成import { ref as _ref } from 'vue',把xxx = value转换成xxx.value = value。导入真实的api后再移除这个api。如果需要source map就生成source map。
总结#
今天我们分析了compileScript的第一部分(day1)。
主要做了以下几件事
- 找入口,找测试单元
- 初始环境分析
- 分析非
setup script block的代码
如果觉得对你有帮助麻烦点个赞,谢谢!
参考#
- ^@babel/parser https://babeljs.io/docs/en/babel-parser
- ^babel-ExportDefaultDeclaration https://babeljs.io/docs/en/babel-types#exportdefaultdeclaration
- ^babel-ObjectExpression https://babeljs.io/docs/en/babel-types#objectexpression
- ^babel-objectProperty https://babeljs.io/docs/en/babel-types#objectproperty
- ^babel-identifier https://babeljs.io/docs/en/babel-types#identifier
- ^ObjectMethod https://babeljs.io/docs/en/babel-types#objectmethod
- ^@vue/compiler-dom https://github.com/vuejs/core/tree/main/packages/compiler-dom
- ^vue-reactivityTransform https://vuejs.org/guide/extras/reactivity-transform.html
- ^@vue/reactivity-transform https://github.com/vuejs/core/tree/main/packages/reactivity-transform
- ^magic-string https://www.npmjs.com/package/magic-string
编辑于 2022-11-22 12:28・IP 属地广东