
前言#
当你在调试webpack的时候,在整个流程中你基本上都能找到hooks的踪影, 所以如果要深入学习那就离不开这篇文章的主角tapable
介绍#

简洁的介绍,但是十分的重要!
整个webpack的执行流程都是基于它,就像是webpack的骨架 。

肖恩大佬的解释
感兴趣的大佬可以去看下这个教程

环境配置#
新开一个项目,或者如果你不嫌累的话直接调试已有项目的源码即可。
yarn add tapable然后创建一个index.js就完成了。
demo#
跟着官网给的例子走
const {
  SyncHook,
} = require('tapable')

class Car {
  constructor() {
    this.hooks = {
      accelerate: new SyncHook(["newSpeed"]),
    };
  }

  /* ... */
}
const car = new Car();

car.hooks.accelerate.tap('test', (a, b) => {
  console.log('test', a, b);
});
car.hooks.accelerate.tap('test2', (...args) => {
  console.log('test2', args)
})

car.hooks.accelerate.call(666);
car.hooks.accelerate.call(123, 456);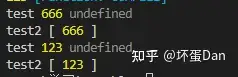
tap传入两个参数,第一个参数用于描述这个callback的用途或者作为id。回调传入后会被放入taps的数组内
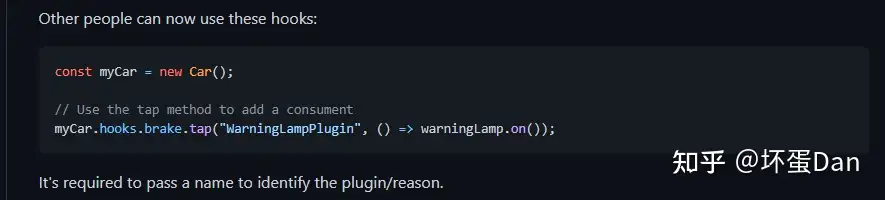
call方法是用于触发钩子的方法,是Hooks里的。
你会发现这第二个call执行后第二个参数拿到的为undefined,这是因为你在new SyncHook的时候只传了一个元素。
话不多说,用是基本会用了,那就来看下源码。
SyncHook#
直接F5进入调试状态
function SyncHook(args = [], name = undefined) {
	const hook = new Hook(args, name);
	hook.constructor = SyncHook;
	hook.tapAsync = TAP_ASYNC;
	hook.tapPromise = TAP_PROMISE;
	hook.compile = COMPILE;
	return hook;
}

SyncHook.prototype = null;

module.exports = SyncHook;一个寄生式继承?super了hook实例上的方法和构造函数。一个同步hook,所以tapAsync和tapPromise都是不允许的。
const TAP_ASYNC = () => {
	throw new Error("tapAsync is not supported on a SyncHook");
};

const TAP_PROMISE = () => {
	throw new Error("tapPromise is not supported on a SyncHook");
};既然是”继承“的hooks,那我们就进入到hooks里看下
class Hook {
	constructor(args = [], name = undefined) {
		this._args = args;
		this.name = name;
		this.taps = [];
		this.interceptors = [];
		this._call = CALL_DELEGATE;
		this.call = CALL_DELEGATE;
		this._callAsync = CALL_ASYNC_DELEGATE;
		this.callAsync = CALL_ASYNC_DELEGATE;
		this._promise = PROMISE_DELEGATE;
		this.promise = PROMISE_DELEGATE;
		this._x = undefined;

		this.compile = this.compile;
		this.tap = this.tap;
		this.tapAsync = this.tapAsync;
		this.tapPromise = this.tapPromise;
	}
        ...省略方法
}
先看下这些参数,后面会提到。
然后来看下方法
先看下tap相关的
tap(options, fn) {
	this._tap("sync", options, fn);
}
不多说
	_tap(type, options, fn) {
		if (typeof options === "string") {
			options = {
				name: options.trim()
			};
		} else if (typeof options !== "object" || options === null) {
			throw new Error("Invalid tap options");
		}
		if (typeof options.name !== "string" || options.name === "") {
			throw new Error("Missing name for tap");
		}
		if (typeof options.context !== "undefined") {
			deprecateContext();
		}
		options = Object.assign({ type, fn }, options);
		options = this._runRegisterInterceptors(options);
		this._insert(options);
}前面一大串对参数的判断就不多说了,但你可以注意到options可以是一个对象也就是tap的第一个参数可以是一个对象,注意这一点,后面会提到。
先来看下处理后的options
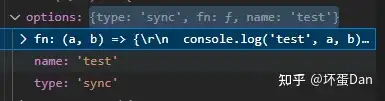
name是你传入的第一个参数type是执行方法的类型fn则是你传入的回调_runRegisterInterceptors方法: 如果当前存在拦截器,那么就将这个拦截器注册到options,实际上是传入options,如果有返回值,则将新值赋予options。
	_runRegisterInterceptors(options) {
		for (const interceptor of this.interceptors) {
			if (interceptor.register) {
				const newOptions = interceptor.register(options);
				if (newOptions !== undefined) {
					options = newOptions;
				}
			}
		}
		return options;
}这个需要遵守官方提供的规范,来看下interceptor例子,同时调整下call代码顺序
car.hooks.accelerate.call(666);

car.hooks.accelerate.intercept({
  call: (newSpeed) => {
    console.log('the new Speed', newSpeed);
  },
  register: (options) => {
    console.log('the register options', options);
    const fn = options.fn
    options.fn = (...args) => {
      console.log('the options.fn', fn);
      fn(...args);
    }
    return options;
  }
})

car.hooks.accelerate.call(123, 456);
来看下改变后的数据
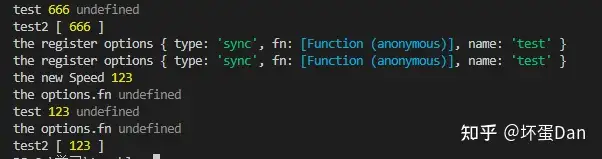
我们调整了下两次call的执行顺序,在第二次前面插入了一个拦截器。
我们可以看到这时输出的结果发生了变化。
- 前两次对应的第一个
call执行。 - 后面两行
register则说明这个拦截器会注册到所有的tap里。 the new Speed 123则是拦截器的call方法,在tap的call之前执行。- 后面四行则是注册之后的
call执行结果。
我们来看下intercept这个方法的源码
	intercept(interceptor) {
		this._resetCompilation();
		this.interceptors.push(Object.assign({}, interceptor));
		if (interceptor.register) {
			for (let i = 0; i < this.taps.length; i++) {
				this.taps[i] = interceptor.register(this.taps[i]);
			}
		}
	}

	_resetCompilation() {
		this.call = this._call;
		this.callAsync = this._callAsync;
		this.promise = this._promise;
} 这个_resetCompilation做了重新生成call方法的操作,这里先不说,因为代码过长,下面再说。
然后将这个拦截器存入数组中,如果有register方法则直接注册到每一个tap里。
然后让我们回到_tap方法里,看到最后一行this._insert(options);
	_insert(item) {
		this._resetCompilation();
		let before;
		if (typeof item.before === "string") {
			before = new Set([item.before]);
		} else if (Array.isArray(item.before)) {
			before = new Set(item.before);
		}
		let stage = 0;
		if (typeof item.stage === "number") {
			stage = item.stage;
		}
		let i = this.taps.length;
		while (i > 0) {
			i--;
			const x = this.taps[i];
			this.taps[i + 1] = x;
			const xStage = x.stage || 0;
			if (before) {
				if (before.has(x.name)) {
					before.delete(x.name);
					continue;
				}
				if (before.size > 0) {
					continue;
				}
			}
			if (xStage > stage) {
				continue;
			}
			i++;
			break;
		}
		this.taps[i] = item;
} 这里又做了一次reset call方法,我们先绕过往下看。
before这里又出现了奇怪的字段,然后去看官方文档,发现居然只有一处地方提到的before
interface Tap {
	name: string,
	type: string
	fn: Function,
	stage: number,
	context: boolean,
	before?: string | Array
}
interface Hook {
	tap: (name: string | Tap, fn: (context?, ...args) => Result) => void,
	...省略
}前面让你留意的options原来就是tap的第一个参数,能传string,也能传入object。before先不说是干什么用的,先往下看_insert的代码。
stage,又是一个字段,先不说是干嘛用的,继续往下看。- 后面几句是将
before进行格式化处理,处理成集合。 - 然后就是遍历,从后往前遍历
			if (before) {
				if (before.has(x.name)) {
					before.delete(x.name);
					continue;
				}
				if (before.size > 0) {
					continue;
				}
			}
			if (xStage > stage) {
				continue;
}这里就很明确before和stage是干嘛用的了,是用于定位的,直到before为空,stage小于遍历元素的位置时插入。当然如果什么都没有的话就是放到最后的。一句话总结就是:从后往前插入,插入到before最前面的一个之前的第stage个。
那么这个tap注册的流程就说完了,接着开始说执行相关的流程。
call的时候做了什么#
先来看下call相关的代码,先回到Hooks的constructor
 class Hook {
	constructor(args = [], name = undefined) {
                ...省略
		this._call = CALL_DELEGATE;
		this.call = CALL_DELEGATE;
                ...省略
		this._x = undefined;
                ...省略
		this.compile = this.compile;
                ...省略
	}
        ...省略方法
}_call自己的call,私人的,不允许外部修改执行。call允许外部执行修改_x私人的x,先不说干嘛的。compile这里赋值的是自己的,Hooks自己的compile是一段throw error,前面也提到了,”继承“时会重写处理,所以这里就不多说了。
来看下CALL_DELEGATE相关的内容
const CALL_DELEGATE = function(...args) {
	this.call = this._createCall("sync");
	return this.call(...args);
};
_createCall(type) {
	return this.compile({
		taps: this.taps,
		interceptors: this.interceptors,
		args: this._args,
		type: type
	});
}这里代码就不多说了,此时的compile方法也被重写了。回到SyncHook,来看下compile
const HookCodeFactory = require("./HookCodeFactory");

class SyncHookCodeFactory extends HookCodeFactory {
	content({ onError, onDone, rethrowIfPossible }) {
		return this.callTapsSeries({
			onError: (i, err) => onError(err),
			onDone,
			rethrowIfPossible
		});
	}
}

const factory = new SyncHookCodeFactory();

const COMPILE = function(options) {
	factory.setup(this, options);
	return factory.create(options);
};先来看下options的数据
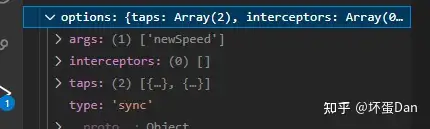
args不多说interceptors所有拦截器taps所有注册事件type执行类型
factory实例来源于SyncHookCodeFactory类,这个类又继承了HookCodeFactory类并实现了自己的content方法。
这其他代码也没什么好说的了,我们直接来看HookCodeFactory类。
class HookCodeFactory {
	constructor(config) {
		this.config = config;
		this.options = undefined;
		this._args = undefined;
	}
	setup(instance, options) {
		instance._x = options.taps.map(t => t.fn);
	}
        ...省略
}instance实例对象,对应上边SyncHook中传入的this。_x:callback队列。
接着来看下create方法,暂时只看sync相关的
 	create(options) {
		this.init(options);
		let fn;
		switch (this.options.type) {
			case "sync":
				fn = new Function(
					this.args(),
					'"use strict";\n' +
					this.header() +
					this.contentWithInterceptors({
						onError: err => `throw ${err};\n`,
						onResult: result => `return ${result};\n`,
						resultReturns: true,
						onDone: () => "",
						rethrowIfPossible: true
					})
				);
				break;
                                ...省略
		}
		this.deinit();
		return fn;
	}
	init(options) {
		this.options = options;
		this._args = options.args.slice();
	}

	deinit() {
		this.options = undefined;
		this._args = undefined;
}- 先对数据进行初始化处理
- 判断当前执行队列是什么类型(这里只展示
Sync) - 创建
function,也就是SyncHook的compile方法,也就是Hook最终执行的方法。 - 数据销毁
- 返回
compile方法
接着我们看下3这里this.args做了什么
	args({ before, after } = {}) {
		let allArgs = this._args;
		if (before) allArgs = [before].concat(allArgs);
		if (after) allArgs = allArgs.concat(after);
		if (allArgs.length === 0) {
			return "";
		} else {
			return allArgs.join(", ");
		}
}它居然去合并了before和after,为什么要这么做后面会提到。
然后来看下this.header
	header() {
		let code = "";
		if (this.needContext()) {
			code += "var _context = {};\n";
		} else {
			code += "var _context;\n";
		}
		code += "var _x = this._x;\n";
		if (this.options.interceptors.length > 0) {
			code += "var _taps = this.taps;\n";
			code += "var _interceptors = this.interceptors;\n";
		}
		return code;
	}

	needContext() {
		for (const tap of this.options.taps) if (tap.context) return true;
		return false;
	}
就是创建变量,没什么好说的。
接着来看下this.contentWithInterceptors做了什么
	contentWithInterceptors(options) {
		if (this.options.interceptors.length > 0) {
			const onError = options.onError;
			const onResult = options.onResult;
			const onDone = options.onDone;
			let code = "";
			for (let i = 0; i < this.options.interceptors.length; i++) {
				const interceptor = this.options.interceptors[i];
				if (interceptor.call) {
					code += `${this.getInterceptor(i)}.call(${this.args({
						before: interceptor.context ? "_context" : undefined
					})});\n`;
				}
			}
			code += this.content(
				Object.assign(options, {
					onError:
						onError &&
						(err => {
							let code = "";
							for (let i = 0; i < this.options.interceptors.length; i++) {
								const interceptor = this.options.interceptors[i];
								if (interceptor.error) {
									code += `${this.getInterceptor(i)}.error(${err});\n`;
								}
							}
							code += onError(err);
							return code;
						}),
                                        ...省略onResult,onDone
				})
			);
			return code;
		} else {
			return this.content(options);
		}
}代码有些长,但是理解起来不难,简单的说就是判断是否存在拦截器,如果有拦截器就先拼接拦截器的回调onError、onResult、onDone和call。
这里你会发现this.args传入了before,而这个before是一个字符串_context并不是前面提到的tap.before,原来这个方法并不是只有tap自身在用,拦截器interceptors也在使用,只是在对函数参数做一层拓展,允许插入多的参数。
而这里的this.content需要我们回到SyncHook文件中
class SyncHookCodeFactory extends HookCodeFactory {
	content({ onError, onDone, rethrowIfPossible }) {
		return this.callTapsSeries({
			onError: (i, err) => onError(err),
			onDone,
			rethrowIfPossible
		});
	}
} 发现他又调用了callTapsSeries方法
	callTapsSeries({
		onError,
		onResult,
		resultReturns,
		onDone,
		doneReturns,
		rethrowIfPossible
	}) {
		if (this.options.taps.length === 0) return onDone();
		const firstAsync = this.options.taps.findIndex(t => t.type !== "sync");

		let code = "";
		let current = onDone;

		for (let j = this.options.taps.length - 1; j >= 0; j--) {
			const i = j;
                        ...省略
			const done = current;
			const doneBreak = skipDone => {
				if (skipDone) return "";
				return onDone();
			};
			const content = this.callTap(i, {
				onError: error => onError(i, error, done, doneBreak),
				onResult:
					onResult &&
					(result => {
						return onResult(i, result, done, doneBreak);
					}),
				onDone: !onResult && done,
				rethrowIfPossible:
					rethrowIfPossible && (firstAsync < 0 || i < firstAsync)
			});
			current = () => content;
		}
		code += current();
		return code;
}这一大段没什么好说的,简单的说就是所有的tap执行callTap的结果进行拼接并返回。
所以我们直接来看下callTap方法
	callTap(tapIndex, { onError, onResult, onDone, rethrowIfPossible }) {
		let code = "";
		let hasTapCached = false;
		for (let i = 0; i < this.options.interceptors.length; i++) {
			const interceptor = this.options.interceptors[i];
			if (interceptor.tap) {
				if (!hasTapCached) {
					code += `var _tap${tapIndex} = ${this.getTap(tapIndex)};\n`;
					hasTapCached = true;
				}
				code += `${this.getInterceptor(i)}.tap(${
					interceptor.context ? "_context, " : ""
				}_tap${tapIndex});\n`;
			}
		}
		code += `var _fn${tapIndex} = ${this.getTapFn(tapIndex)};\n`;
		const tap = this.options.taps[tapIndex];
		switch (tap.type) {
			case "sync":
				if (!rethrowIfPossible) {
					code += `var _hasError${tapIndex} = false;\n`;
					code += "try {\n";
				}
				if (onResult) {
					code += `var _result${tapIndex} = _fn${tapIndex}(${this.args({
						before: tap.context ? "_context" : undefined
					})});\n`;
				} else {
					code += `_fn${tapIndex}(${this.args({
						before: tap.context ? "_context" : undefined
					})});\n`;
				}
				if (!rethrowIfPossible) {
					code += "} catch(_err) {\n";
					code += `_hasError${tapIndex} = true;\n`;
					code += onError("_err");
					code += "}\n";
					code += `if(!_hasError${tapIndex}) {\n`;
				}
				if (onResult) {
					code += onResult(`_result${tapIndex}`);
				}
				if (onDone) {
					code += onDone();
				}
				if (!rethrowIfPossible) {
					code += "}\n";
				}
				break;
				...省略
			}
		return code;
} 其实也没什么好说的,简单的说就是字符串形式的执行tap回调队列,如果有拦截器并且有tap方法,则会先执行完所有拦截器的tap,然后返回code。
那么这一大段就说完了,我估计你已经懵了。
所以先来总结这个create方法里的this.contentWithInterceptors 的 this.content做了什么。
content方法是来自SyncHook里的SyncHookCodeFactory类,调用了callTapSeries方法。callTapSeries方法里按顺序对tap执行callTap,并对结果进行拼接callTap先是判断是否有拦截器并且是否存在可执行的tap方法,有则执行。拦截器执行完后再执行tap的 ,拼接两者然后返回。注意这里的拦截器,是所有的。callTapSeries返回拼接结果。
所以总结下来content方法是将所有tap执行代码拼接并返回,当然这个方法是自定义的,在不同的Hooks中继承重写可能是不同的方式。
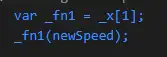
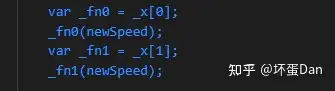
来看下数据
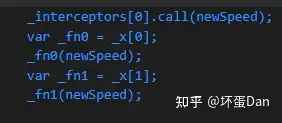
然后到create的this.contentWithInterceptors做了什么
- 判断拦截器中是否存在
call方法,有则拼接执行的代码。 - 拼接
content返回的代码,既是所有tap的执行代码,同时接入几个回调的执行代码onError、onResult、onDone。 - 返回
code字符串
然后我们再回到create方法
- 初始化数据
- 将上边的
contentWithInterceptors返回的字符串以及_args作为参数传入new Function中 ,生成执行函数。 - 数据注销
- 返回
function
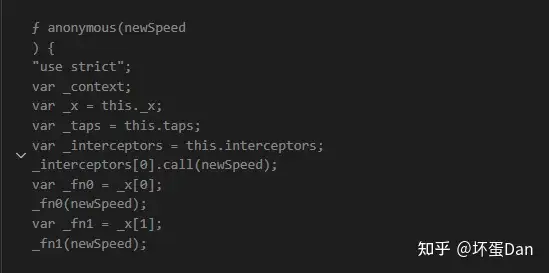
然后回到SyncHook中,看到compile方法 ,这是重写后的方法,也就是create返回的那个fn。
然后我们再回到最开始的Hook中的this.call
const CALL_DELEGATE = function(...args) {
	this.call = this._createCall("sync");
	return this.call(...args);
}; 绕了整整一大圈,就为了跟踪这个call(既是上边create返回的fn)到底做了什么。
所以最后总结简单的说就是SyncHook”继承“ Hook重写call方法,通过不同的type生成不同的字符串,然后通过new Function的方式生成执行函数并返回给compile,compile再返回给call。
那么执行的代码就说完了,当然全程只说了sync相关的代码,大佬们有兴趣可以自己去看源码。
最后#
最后附上tapable的连接
https://github.com/webpack/tapablegithub.com/webpack/tapable
参考#
- 官网描述tap第一个参数 https://github.com/webpack/tapable
发布于 2022-09-05 11:31