
前言#
昨天我们找到了入口
坏蛋Dan:vue/compiler-sfc源码分析学习--part4:如何处理style--day1
现在我们来开始调试分析。
选择测试单元#
还是用之前调试compileTemplate的那个demo。
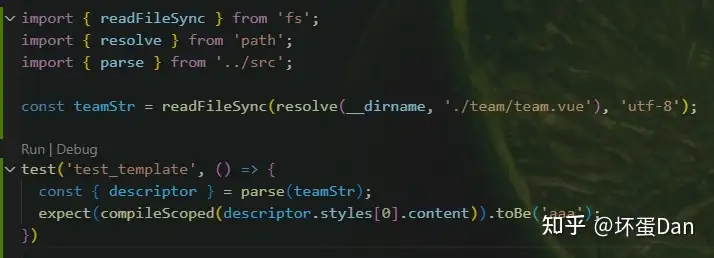
由于接收的source仅限于style block的,所以这里得先用parse进行切割拿到style block的content,之前讲parse那一章的时候也讲过,是允许同时存在多个style block的,所以styles是一个数组。
不过这样还没完,由于我们的demo之前并没有写多少样式,所以这里还需要补充一下。
<style scoped>
.wrapper {
  color: v-bind(color);
}
.team_name_and_logo {
  background-color: #fff;
  font-size: 20px;
}

.wrapper ::v-deep(.add_mem_box) {
  color: blue;
}

.img {
  display: flex;
  animation: rotate .3s linear infinite;
}

.img::after {
  content: '';
  width: 10px;
  height: 10px;
  display: flex;

}


@keyframes rotate {
  from {
    transform: rotateZ(0deg);
  }
  to {
    transform: rotateZ(360deg);
  }
}

</style> 有伪元素、css变量、v-deep穿透、动画差不多了,后面不够再补。
处理style block#
export function compileStyle(
  options: SFCStyleCompileOptions
): SFCStyleCompileResults {
  return doCompileStyle({
    ...options,
    isAsync: false
  }) as SFCStyleCompileResults
}
看这个样子代码逻辑估计也长不了多少。
export function doCompileStyle(
  options: SFCAsyncStyleCompileOptions
): SFCStyleCompileResults | Promise<SFCStyleCompileResults> {
  const {
    filename,
    id,
    scoped = false,
    trim = true,
    isProd = false,
    modules = false,
    modulesOptions = {},
    preprocessLang,
    postcssOptions,
    postcssPlugins
  } = options
  const preprocessor = preprocessLang && processors[preprocessLang]
  const preProcessedSource = preprocessor && preprocess(options, preprocessor)
  const map = preProcessedSource
    ? preProcessedSource.map
    : options.inMap || options.map
  const source = preProcessedSource ? preProcessedSource.code : options.source

  const shortId = id.replace(/^data-v-/, '')
  const longId = `data-v-${shortId}`

  const plugins = (postcssPlugins || []).slice()
  plugins.unshift(cssVarsPlugin({ id: shortId, isProd }))
  if (trim) {
    plugins.push(trimPlugin())
  }
  if (scoped) {
    plugins.push(scopedPlugin(longId))
  }
  let cssModules: Record<string, string> | undefined
  if (modules) {
    if (__GLOBAL__ || __ESM_BROWSER__) {
      throw new Error(
        '[@vue/compiler-sfc] `modules` option is not supported in the browser build.'
      )
    }
    if (!options.isAsync) {
      throw new Error(
        '[@vue/compiler-sfc] `modules` option can only be used with compileStyleAsync().'
      )
    }
    plugins.push(
      postcssModules({
        ...modulesOptions,
        getJSON: (_cssFileName: string, json: Record<string, string>) => {
          cssModules = json
        }
      })
    )
  }

  const postCSSOptions: ProcessOptions = {
    ...postcssOptions,
    to: filename,
    from: filename
  }
  if (map) {
    postCSSOptions.map = {
      inline: false,
      annotation: false,
      prev: map
    }
  }

  let result: LazyResult | undefined
  let code: string | undefined
  let outMap: SourceMap | undefined
  // stylus output include plain css. so need remove the repeat item
  const dependencies = new Set(
    preProcessedSource ? preProcessedSource.dependencies : []
  )
  // sass has filename self when provided filename option
  dependencies.delete(filename)

  const errors: Error[] = []
  if (preProcessedSource && preProcessedSource.errors.length) {
    errors.push(...preProcessedSource.errors)
  }

  const recordPlainCssDependencies = (messages: Message[]) => {
    messages.forEach(msg => {
      if (msg.type === 'dependency') {
        // postcss output path is absolute position path
        dependencies.add(msg.file)
      }
    })
    return dependencies
  }

  try {
    result = postcss(plugins).process(source, postCSSOptions)

    // In async mode, return a promise.
    if (options.isAsync) {
      return result
        .then(result => ({
          code: result.css || '',
          map: result.map && result.map.toJSON(),
          errors,
          modules: cssModules,
          rawResult: result,
          dependencies: recordPlainCssDependencies(result.messages)
        }))
        .catch(error => ({
          code: '',
          map: undefined,
          errors: [...errors, error],
          rawResult: undefined,
          dependencies
        }))
    }

    recordPlainCssDependencies(result.messages)
    // force synchronous transform (we know we only have sync plugins)
    code = result.css
    outMap = result.map
  } catch (e: any) {
    errors.push(e)
  }

  return {
    code: code || ``,
    map: outMap && outMap.toJSON(),
    errors,
    rawResult: result,
    dependencies
  }
}
没了,就这么一点,我们来分析下。
style预处理器#
preprocessLang: 参考template的,大家应该也知道是啥了,具体是这几位:less、sass、scss、styl、stylus。processors:自然就是这几位css预处理器对应的处理方法,我们来看其其中一个即可。当然scss和sass是用的同一个预处理器
const scss: StylePreprocessor = (source, map, options, load = require) => {
  const nodeSass = load('sass')
  const finalOptions = {
    ...options,
    data: getSource(source, options.filename, options.additionalData),
    file: options.filename,
    outFile: options.filename,
    sourceMap: !!map
  }

  try {
    const result = nodeSass.renderSync(finalOptions)
    const dependencies = result.stats.includedFiles
    if (map) {
      return {
        code: result.css.toString(),
        map: merge(map, JSON.parse(result.map.toString())),
        errors: [],
        dependencies
      }
    }

    return { code: result.css.toString(), errors: [], dependencies }
  } catch (e: any) {
    return { code: '', errors: [e], dependencies: [] }
  }
}会去load加载sass的包, 然后处理之后再返回。
本来打算加个sass的预处理器到这个compiler-sfc的包中,但是我一看发现有个sass的包。那就恭敬不如从命了。
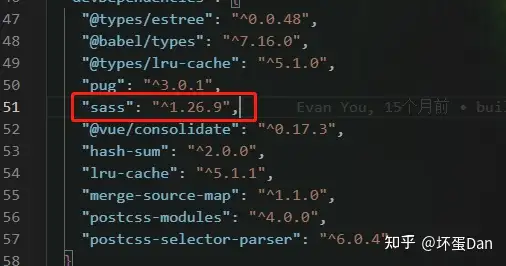
那么来改下我们的代码
<style lang="scss" scoped>
.wrapper {
  color: v-bind(color);
  .team_name_and_logo {
    background-color: #fff;
    font-size: 20px;
  }
  ::v-deep(.add_mem_box) {
    color: blue;
  }
  .img {
    display: flex;
    animation: rotate 0.3s linear infinite;
  }

  .img::after {
    content: '';
    width: 10px;
    height: 10px;
    display: flex;
  }
}
</style>
然后改下我们的测试单元
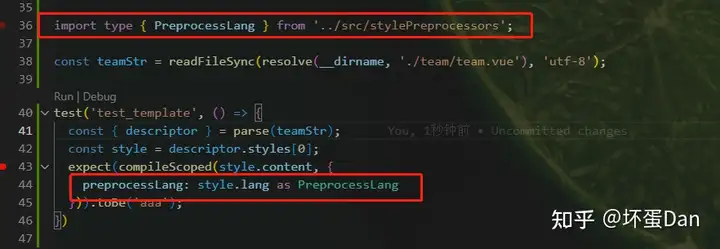
重新跑一下
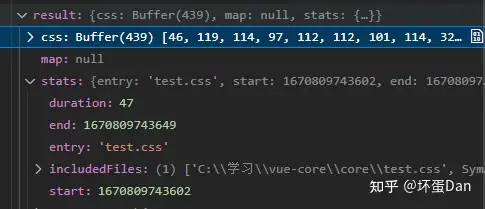
可以看到转换出来的结果是一段二进制。而转换成字符串的结果则是和原生css没什么差别,毕竟浏览器就认识这玩意儿。
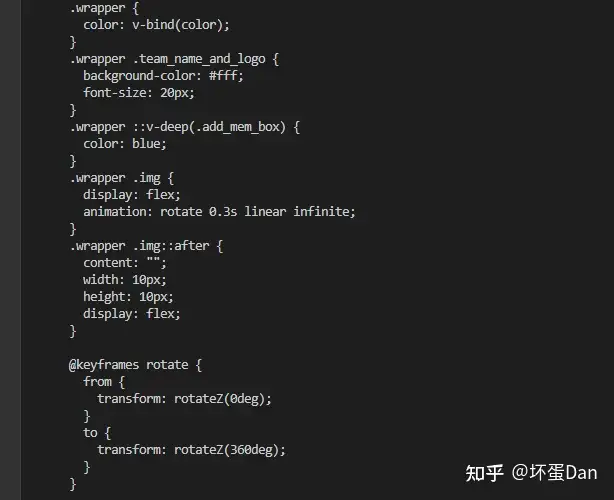
不过有个点需要注意的是v-bind(color)并没有转换,这不是sass的语法,而是vue3.x的语法,所以这里自然就保留了。
ok,回到我们的doCompile方法
postcssPlugins: 自然是postcss相关的插件,我们并没有,代码最终会被postcss调用,所以这里不用担心会有什么问题。cssVarsPlugin: 我直接放到下面开一个小章节吧
cssVarsPlugin#
 export const cssVarsPlugin: PluginCreator<CssVarsPluginOptions> = opts => {
  const { id, isProd } = opts!
  return {
    postcssPlugin: 'vue-sfc-vars',
    Declaration(decl) {
      // rewrite CSS variables
      const value = decl.value
      if (vBindRE.test(value)) {
        vBindRE.lastIndex = 0
        let transformed = ''
        let lastIndex = 0
        let match
        while ((match = vBindRE.exec(value))) {
          const start = match.index + match[0].length
          const end = lexBinding(value, start)
          if (end !== null) {
            const variable = normalizeExpression(value.slice(start, end))
            transformed +=
              value.slice(lastIndex, match.index) +
              `var(--${genVarName(id, variable, isProd)})`
            lastIndex = end + 1
          }
        }
        decl.value = transformed + value.slice(lastIndex)
      }
    }
  }
}
cssVarsPlugin.postcss = true可以看出postcss的插件规则和babel是挺相似的
vBindRE:
const vBindRE = /v-bind\s*\(/g 这一段代码没啥好说的,就是把v-bind(xxx)转换为原生的var(--xxx)。
回到我们的doCompile方法中
trimPlugin: 这个plugin就不看代码了,只是调整代码的长相(比如帮你换行)scopedPlugin: 看名字就知道是给样式加scopedId的,我们来看下代码。
给样式加scoped#
const scopedPlugin: PluginCreator<string> = (id = '') => {
  const keyframes = Object.create(null)
  const shortId = id.replace(/^data-v-/, '')

  return {
    postcssPlugin: 'vue-sfc-scoped',
    Rule(rule) {
      processRule(id, rule)
    },
    AtRule(node) {
      if (
        /-?keyframes$/.test(node.name) &&
        !node.params.endsWith(`-${shortId}`)
      ) {
        // register keyframes
        keyframes[node.params] = node.params = node.params + '-' + shortId
      }
    },
    OnceExit(root) {
      if (Object.keys(keyframes).length) {
        // If keyframes are found in this <style>, find and rewrite animation names
        // in declarations.
        // Caveat: this only works for keyframes and animation rules in the same
        // <style> element.
        // individual animation-name declaration
        root.walkDecls(decl => {
          if (animationNameRE.test(decl.prop)) {
            decl.value = decl.value
              .split(',')
              .map(v => keyframes[v.trim()] || v.trim())
              .join(',')
          }
          // shorthand
          if (animationRE.test(decl.prop)) {
            decl.value = decl.value
              .split(',')
              .map(v => {
                const vals = v.trim().split(/\s+/)
                const i = vals.findIndex(val => keyframes[val])
                if (i !== -1) {
                  vals.splice(i, 1, keyframes[vals[i]])
                  return vals.join(' ')
                } else {
                  return v
                }
              })
              .join(',')
          }
        })
      }
    }
  }
} AtRule: 这个指的是@开头的样式,比如@keyframes动画样式。
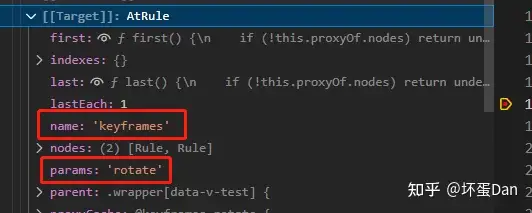
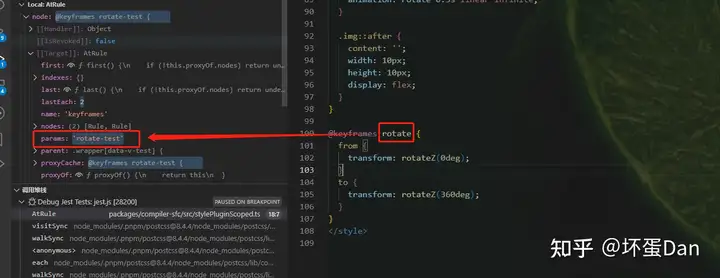
可以看到转换成出来变成rotate-test,这个test是我们的文件名
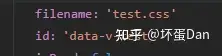
至于为啥是test,而不是我们的team,因为我们压根没把id传进去,所以默认的test。
OnceExit: 会在所有的样式都过了一遍之后调用,这里主要是用来重写animation这个样式,为什么呢?因为我们把@keyframes的name改了,如果不把animation调用的name同步改动的话那这个语句就不会生效了。Rule:自然是普通的样式规则了,当然,这个rule不仅有开发者定义的,还有一些内置的,比如@keyframes里的from、to都是rule。processRule: 来看下代码
function processRule(id: string, rule: Rule) {
  if (
    processedRules.has(rule) ||
    (rule.parent &&
      rule.parent.type === 'atrule' &&
      /-?keyframes$/.test((rule.parent as AtRule).name))
  ) {
    return
  }
  processedRules.add(rule)
  rule.selector = selectorParser(selectorRoot => {
    selectorRoot.each(selector => {
      rewriteSelector(id, selector, selectorRoot)
    })
  }).processSync(rule.selector)
} 如果遇到@keyframes里的rule直接跳过,因为没必要,前面已经改过这个@keyframes的名字了。
然后重写rule的名字,给他们也加上scopedId。
不过rewriteSelector这个方法我们需要看下代码,里面有特殊场景的处理。
function rewriteSelector(
  id: string,
  selector: selectorParser.Selector,
  selectorRoot: selectorParser.Root,
  slotted = false
) {
  let node: selectorParser.Node | null = null
  let shouldInject = true
  // find the last child node to insert attribute selector
  selector.each(n => {
    // DEPRECATED ">>>" and "/deep/" combinator
    if (
      n.type === 'combinator' &&
      (n.value === '>>>' || n.value === '/deep/')
    ) {
      n.value = ' '
      n.spaces.before = n.spaces.after = ''
      warn(
        `the >>> and /deep/ combinators have been deprecated. ` +
          `Use :deep() instead.`
      )
      return false
    }

    if (n.type === 'pseudo') {
      const { value } = n
      // deep: inject [id] attribute at the node before the ::v-deep
      // combinator.
      if (value === ':deep' || value === '::v-deep') {
        if (n.nodes.length) {
          // .foo ::v-deep(.bar) -> .foo[xxxxxxx] .bar
          // replace the current node with ::v-deep's inner selector
          let last: selectorParser.Selector['nodes'][0] = n
          n.nodes[0].each(ss => {
            selector.insertAfter(last, ss)
            last = ss
          })
          // insert a space combinator before if it doesn't already have one
          const prev = selector.at(selector.index(n) - 1)
          if (!prev || !isSpaceCombinator(prev)) {
            selector.insertAfter(
              n,
              selectorParser.combinator({
                value: ' '
              })
            )
          }
          selector.removeChild(n)
        } else {
          // DEPRECATED usage
          // .foo ::v-deep .bar -> .foo[xxxxxxx] .bar
          warn(
            `::v-deep usage as a combinator has ` +
              `been deprecated. Use :deep(<inner-selector>) instead.`
          )
          const prev = selector.at(selector.index(n) - 1)
          if (prev && isSpaceCombinator(prev)) {
            selector.removeChild(prev)
          }
          selector.removeChild(n)
        }
        return false
      }

      // slot: use selector inside `::v-slotted` and inject [id + '-s']
      // instead.
      // ::v-slotted(.foo) -> .foo[xxxxxxx-s]
      if (value === ':slotted' || value === '::v-slotted') {
        rewriteSelector(id, n.nodes[0], selectorRoot, true /* slotted */)
        let last: selectorParser.Selector['nodes'][0] = n
        n.nodes[0].each(ss => {
          selector.insertAfter(last, ss)
          last = ss
        })
        // selector.insertAfter(n, n.nodes[0])
        selector.removeChild(n)
        // since slotted attribute already scopes the selector there's no
        // need for the non-slot attribute.
        shouldInject = false
        return false
      }

      // global: replace with inner selector and do not inject [id].
      // ::v-global(.foo) -> .foo
      if (value === ':global' || value === '::v-global') {
        selectorRoot.insertAfter(selector, n.nodes[0])
        selectorRoot.removeChild(selector)
        return false
      }
    }

    if (n.type !== 'pseudo' && n.type !== 'combinator') {
      node = n
    }
  })

  if (node) {
    ;(node as selectorParser.Node).spaces.after = ''
  } else {
    // For deep selectors & standalone pseudo selectors,
    // the attribute selectors are prepended rather than appended.
    // So all leading spaces must be eliminated to avoid problems.
    selector.first.spaces.before = ''
  }

  if (shouldInject) {
    const idToAdd = slotted ? id + '-s' : id
    selector.insertAfter(
      // If node is null it means we need to inject [id] at the start
      // insertAfter can handle `null` here
      node as any,
      selectorParser.attribute({
        attribute: idToAdd,
        value: idToAdd,
        raws: {},
        quoteMark: `"`
      })
    )
  }
}
有点长。。。
场景:
- 使用
>>>或者/deep/,会被警告:他俩已经被废弃了,也没有代码处理他们,用:deep()替换。 - 处理
:deep()以及::v-deep()的场景,会被处理成.a[id] .b,而.a ::v-deep .b会被警告:已经废弃。 - 处理
:slotted以及::v-slotted的场景,该场景是用来处理slot样式的,::v-slotted(.foo)会被处理成.foo[id-s]。 - 处理
:global以及::v-global的场景,由于样式在全局,所以没必要加上scopedId,::v-global(.foo)会被处理成.foo。
这里有个点需要注意的那就是从哪注入id,一般的selector也就是常规的.a, .b这种都是插后面,而:deep这种就不适合插后面,而是应该插前面的,毕竟不在同个作用域里。
回到我们的doCompileStyle方法中。
然后是处理css-module
啥是css-module呢?简单的说就是编译过程中,将一个css文件当作是一个模块,而里面的样式比如.a可以直接在另一个文件中以json对象属性的方式调用,来看个例子
.type.css
 .serif-font {
  font-family: Georgia, serif;
}

.display {
  composes: serif-font;
  font-size: 30px;
  line-height: 35px;
}
index.js
import type from "./type.css";

element.innerHTML =
  `<h1 class="${type.display}">
    This is a heading
  </h1>`;
然后编译出来的结果是
<h1 class="_type__display_0980340 _type__serif_404840">
  Heading title
</h1>可以看到自带scoped。
当然,并不是原生的,你需要借助webpack[1]或者browserify[2] 等编译器来处理
而在我们这里是用postcss-modules[3]
然后就是调用postcss传入plugin处理source了
最后返回。
来看下最终的数据
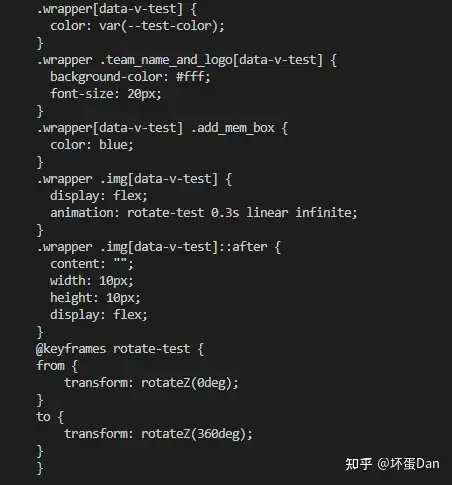
总结#
步骤的话可以简单的分为几部分
- 如果有用到预处理器的话那就先引入对应的预处理器,然后处理成原生
css - 添加
postcss的plugin,主要分成以下部分
cssVarsPlugin: 处理vue3.x的变量v-bind(xx),处理成原生的var(--xx)。trimPlugin: 格式调整,由于格式会引起一些问题比如后面加scopedId的问题。scopedPlugin: 给样式规则添加scopedId,具体如何处理上面有分析。- 调用
postcss-modules处理css-modules(如果module这个标志位为true的话)。
- 调用
postcss,把plugins传入,然后执行process把代码转换成原生的样式。
最后,如果觉得这篇文章对你有帮助的话,请务必点个赞~
参考#
- ^webpack https://webpack.js.org/
- ^browserify http://browserify.org/
- ^postcss-modules https://www.npmjs.com/package/postcss-modules
编辑于 2022-12-12 14:54・IP 属地广东