
前言#
昨天我们看完了理论相关的
今天我们继续往下
PS:今天的内容依旧是理论上的,如果不感兴趣,只是想学怎么用,那就不用看了。
幕后(under the hood):执行FutureS和任务(Tasks)#
我们接下来会了解到幕后是如何安排异步任务和执行Future S的。
这些知识对我们理解async/await是如何工作的来说是相当有用的。
Future trait#
Future这个trait是rust中异步编程的核心。一个Future是一异步运算,可以提供一个值(包括())。
一个简单的Future trait大概长这样
 trait SimpleFuture {
    type Output;
    fn poll(&mut self, wake: fn()) -> Poll<Self::Output>;
}

enum Poll<T> {
    Ready(T),
    Pending,
}你可以调用poll这个方法,驱动这个future继续执行直到完成。
当一个future完成时,它会返回一个Poll::Ready(result)类型的值。
而如果还没完成,它返回值的类型则是Poll::Pending,并且安排wake()函数在完成的时候被调用,wake被调用之后通知执行器(executor)驱动Future再重新调用poll方法。
看不懂?看不懂就对了,我也看不懂。。。
我们先mark,后面看例子慢慢来。
不过从这里可以看出这个wake方法是Future和执行器的桥梁,没有它执行器不知道什么时候通知这个Future去执行poll,那么如果还想去完成,就得连续的通知Future调用poll方法。
不过这种方式也不是没有,比如前端主动请求某个状态(基于http),只能通过定时轮询获取等。
另外一个例子就是socket,它获取的数据有可能是无效的,当获取的值是有效的时候就会返回Poll::Ready(data),而如果值无效就会被blocked堵塞直到有值,这个堵塞的过程包括了注册wake方法直到这个方法被executor也就是执行器调用。
来看大概的代码
pub struct SocketRead<'a> {
    socket: &'a Socket,
}

impl SimpleFuture for SocketRead<'_> {
    type Output = Vec<u8>;

    fn poll(&mut self, wake: fn()) -> Poll<Self::Output> {
        if self.socket.has_data_to_read() {
            // The socket has data -- read it into a buffer and return it.
            Poll::Ready(self.socket.read_buf())
        } else {
            // The socket does not yet have data.
            //
            // Arrange for `wake` to be called once data is available.
            // When data becomes available, `wake` will be called, and the
            // user of this `Future` will know to call `poll` again and
            // receive data.
            self.socket.set_readable_callback(wake);
            Poll::Pending
        }
    }
}当poll时发现值是有效的,直接就Poll::Ready返回,否则把wake函数注册到socket的set_readable_callback里,然后返回状态Pending,等到时有有效的值之后socket就会执行我们的wake方法,然后我们的wake方法里面有调用poll的逻辑,这样就完成poll的触发了。
这个不是持续性的,因为socket在自身拿到值之后才会触发wake通知future去再次调用poll方法。
这个socket就是我们的执行器(executor)。
现在是不是有些清楚了~
这种Future S的模型允许我们组合不同的异步操作,这中间没有任何的内存分配损耗。
所以一次执行多个异步特性可以用allocation-free也就是免内存分配状态机(state machines)来实现,比如下面这个例子
/// A SimpleFuture that runs two other futures to completion concurrently.
///
/// Concurrency is achieved via the fact that calls to `poll` each future
/// may be interleaved, allowing each future to advance itself at its own pace.
pub struct Join<FutureA, FutureB> {
    // Each field may contain a future that should be run to completion.
    // If the future has already completed, the field is set to `None`.
    // This prevents us from polling a future after it has completed, which
    // would violate the contract of the `Future` trait.
    a: Option<FutureA>,
    b: Option<FutureB>,
}

impl<FutureA, FutureB> SimpleFuture for Join<FutureA, FutureB>
where
    FutureA: SimpleFuture<Output = ()>,
    FutureB: SimpleFuture<Output = ()>,
{
    type Output = ();
    fn poll(&mut self, wake: fn()) -> Poll<Self::Output> {
        // Attempt to complete future `a`.
        if let Some(a) = &mut self.a {
            if let Poll::Ready(()) = a.poll(wake) {
                self.a.take();
            }
        }

        // Attempt to complete future `b`.
        if let Some(b) = &mut self.b {
            if let Poll::Ready(()) = b.poll(wake) {
                self.b.take();
            }
        }

        if self.a.is_none() && self.b.is_none() {
            // Both futures have completed -- we can return successfully
            Poll::Ready(())
        } else {
            // One or both futures returned `Poll::Pending` and still have
            // work to do. They will call `wake()` when progress can be made.
            Poll::Pending
        }
    }
}可以看到join调用poll方法,它的里面分别调用不同的future的poll方法
当所有future都ready之后状态才会变成ready。
然后将它们的值放到自己身上。
这中间没有任何的内存分配。
和前端的Promise.all方法有些类似。
我们再来看个例子
/// A SimpleFuture that runs two futures to completion, one after another.
//
// Note: for the purposes of this simple example, `AndThenFut` assumes both
// the first and second futures are available at creation-time. The real
// `AndThen` combinator allows creating the second future based on the output
// of the first future, like `get_breakfast.and_then(|food| eat(food))`.
pub struct AndThenFut<FutureA, FutureB> {
    first: Option<FutureA>,
    second: FutureB,
}

impl<FutureA, FutureB> SimpleFuture for AndThenFut<FutureA, FutureB>
where
    FutureA: SimpleFuture<Output = ()>,
    FutureB: SimpleFuture<Output = ()>,
{
    type Output = ();
    fn poll(&mut self, wake: fn()) -> Poll<Self::Output> {
        if let Some(first) = &mut self.first {
            match first.poll(wake) {
                // We've completed the first future -- remove it and start on
                // the second!
                Poll::Ready(()) => self.first.take(),
                // We couldn't yet complete the first future.
                Poll::Pending => return Poll::Pending,
            };
        }
        // Now that the first future is done, attempt to complete the second.
        self.second.poll(wake)
    }
}这回的例子是连续的两个异步,只有第一个future完成了才能执行第二个异步。
如果第一次匹配到Pending,直接return终止当前poll行为。
当futureA完成之后才会执行第二个future的poll。
然后我们来看下真的Future trait长啥样
trait Future {
    type Output;
    fn poll(
        // Note the change from `&mut self` to `Pin<&mut Self>`:
        self: Pin<&mut Self>,
        // and the change from `wake: fn()` to `cx: &mut Context<'_>`:
        cx: &mut Context<'_>,
    ) -> Poll<Self::Output>;
} 真的和我们的demo Future有以下几点不同:
self用Pin这个类型包裹,这玩意儿具体下一章会说,现在只需要知道是创建不可移动的(immovable)futures实例的。不可移动的对象(immovable objects)可以在它的字段里存储指针。比如:struct MyFut { a: i32, ptr_to_a: *const i32 }。总之Pinning对于async/await来说是不可或缺的。wake: fn()也就是wake函数参数被替换成&mut Context<'_>。wake只是一个函数参数(函数指针),它能做的事情相对于上下文来说是少很多的,比如存储数据等。看过一些前端打包工具比如webpack之后你应该觉得这是有道理的,太多东西了,什么插件啊loader啊之类的。最重要的一点就是这个编译器(compiler)是(相对)唯一的,可以通过它联通上下文。
使用waker唤醒task#
一般futures都不会在第一次poll的时候就已经是Ready状态。
因此,waker是相当重要的一环,它可以确保下一次future调用poll的时候已经是Ready状态了。
每次轮询future的时候,它都会作为这个task(下面直接叫任务了)轮询的一部分。
task是future的最外层(top-level)表现,它会被提交给执行器。
waker提供了wake方法,wake方法会被用来通知执行器去唤醒关联的任务。
当wake方法被调用之后,执行器就知道这个任务可以被唤醒了。
另外Waker也实现了clone这个方法,可以用来克隆和存储。
我们来尝试实现一个自己的Waker。
实现一个定时器#
定时器是一个常见的异步场景,会在固定且明确的时间之后唤醒任务。
我们来创建一个新项目
cd ../
cargo new timer_future --lib然后在lib.rs中
use std::{
    future::Future,
    pin::Pin,
    sync::{Arc, Mutex},
    task::{Context, Poll, Waker},
    thread,
    time::Duration,
};

pub struct TimerFuture {
    shared_state: Arc<Mutex<SharedState>>,
}

/// Shared state between the future and the waiting thread
struct SharedState {
    /// Whether or not the sleep time has elapsed
    completed: bool,

    /// The waker for the task that `TimerFuture` is running on.
    /// The thread can use this after setting `completed = true` to tell
    /// `TimerFuture`'s task to wake up, see that `completed = true`, and
    /// move forward.
    waker: Option<Waker>,
}

impl Future for TimerFuture {
    type Output = ();
    fn poll(self: Pin<&mut Self>, cx: &mut Context<'_>) -> Poll<Self::Output> {
        println!("5");
        // Look at the shared state to see if the timer has already completed.
        let mut shared_state = self.shared_state.lock().unwrap();
        if shared_state.completed {
            Poll::Ready(())
        } else {
            // Set waker so that the thread can wake up the current task
            // when the timer has completed, ensuring that the future is polled
            // again and sees that `completed = true`.
            //
            // It's tempting to do this once rather than repeatedly cloning
            // the waker each time. However, the `TimerFuture` can move between
            // tasks on the executor, which could cause a stale waker pointing
            // to the wrong task, preventing `TimerFuture` from waking up
            // correctly.
            //
            // N.B. it's possible to check for this using the `Waker::will_wake`
            // function, but we omit that here to keep things simple.
            shared_state.waker = Some(cx.waker().clone());
            Poll::Pending
        }
    }
}

impl TimerFuture {
    /// Create a new `TimerFuture` which will complete after the provided
    /// timeout.
    pub fn new(duration: Duration) -> Self {
        let shared_state = Arc::new(Mutex::new(SharedState {
            completed: false,
            waker: None,
        }));

        // Spawn the new thread
        let thread_shared_state = shared_state.clone();
        thread::spawn(move || {
            thread::sleep(duration);
            let mut shared_state = thread_shared_state.lock().unwrap();
            // Signal that the timer has completed and wake up the last
            // task on which the future was polled, if one exists.
            shared_state.completed = true;
            if let Some(waker) = shared_state.waker.take() {
                waker.wake()
            }
        });

        TimerFuture { shared_state }
    }
}
看着有些懵是正常的。
我们一点一点来分析,先来看下TimerFuture,它就是我们的定时器。
它有一个字段shared_state,这个字段是多多线程多所有权可修改类型。Arc和Mutex相信大家应该还记得。
这个字段为什么要允许多线程多所有权可修改呢?
因为定时器实际上是开一个新的线程,然后将任务放到新的线程里,等待时间后再唤醒这个任务运行。
既然如此,那这个SharedState应该就是管理定时器状态的玩意儿。
SharedState有俩字段:
completed:是个bool类型用来代表这个定时器的状态,当为true的时候就可以进入Ready状态了。waker:自然就是这一章的主角,到时会唤起这个定时器里面的任务。
然后我们给这个TimerFuture实现Future trait。
关联类型Output是()。
poll方法是必须实现的,它获取当前share_state的状态。
如果completed是true,那么这个时候就不需要waker了,直接返回Ready状态。
如果还是false,那么就clone一份context.waker到shared_state.waker里,这样就能在别的线程唤醒这个任务了。
每一次poll状态不是true时都需要重新赋值一遍,为什么呢?因为这个waker可能变成别的任务的waker了。
然后给这个TimerFuture实现一个new关联函数用来创建timer实例。
里面会开一个线程,这个线程会等待duration之后才会执行walker.wake。
那么现在这个timer我们就实现了,我们来调用下。
不过现在它并不能跑任务,所以我们来拓展下。
    pub fn new(duration: Duration, call_back: fn()) -> (Self, JoinHandle<()>) {
        let shared_state = Arc::new(Mutex::new(SharedState {
            completed: false,
            waker: None,
        }));

        // Spawn the new thread
        let thread_shared_state = shared_state.clone();
        let join = thread::spawn(move || {
            thread::sleep(duration);
            let mut shared_state = thread_shared_state.lock().unwrap();
            // Signal that the timer has completed and wake up the last
            // task on which the future was polled, if one exists.
            shared_state.completed = true;
            if let Some(waker) = shared_state.waker.take() {
                println!("4");
                waker.wake();
            }
            call_back();
        });
        (TimerFuture { shared_state }, join)
}首先加了个task回调,然后join等待这个线程。 注意我们的join得在主线程里等,不然和同步没差别。
然后我们来调用下
use std::time::Duration;
use timer_future::TimerFuture;
use std::{ thread::{ JoinHandle } };
fn main () {
    dbg!("1");
    let (timer, join) = TimerFuture::new(Duration::from_secs(3), || {
        dbg!("2");
    });
    dbg!("3");
    JoinHandle::join(join);
}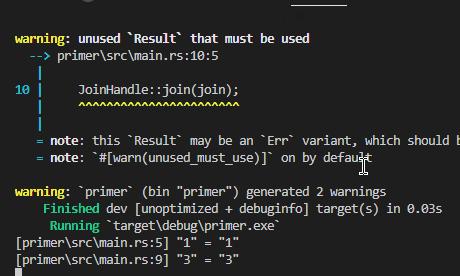
可以看到3比2执行的早。
实际上这里有一个大问题,下面会说。
实现一个执行器(executor)#
上面我留了一个大问题,你应该也发现了,当你运行时4和5都没有打印出来,也就是说整个异步流程压根没有执行。
其实我们这里的异步是用的OS threads模型,当你去掉shared_state的代码之后,你会发现依旧运行正常,完全不影响。
为什么会这样呢?
因为没有执行器来驱动这块代码。
相信这个执行器你已经思考很久是个啥玩意儿了。
Rust中的Future S是lazy的,也就是惰性的,只有被激活时才会干活。
所以这里需要有一个执行器去调用poll来给这一块异步代码一个冲力让它运行起来。
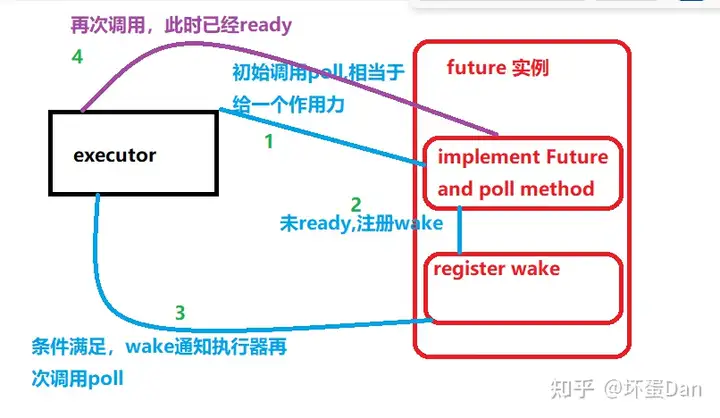
看了这张图,应该比较清晰了吧。不过这里有个点需要注意,这个wake方法的调用会影响执行器触发poll的频率,所以并不是每次都是第二次就ready的。
简单的总结下执行器在这个流程中的作用:
- 给异步代码一个动力(初始
poll) - 被
wake通知也就是被唤醒,再次调用poll
接下来我们来实现一个我们自己的执行器,这里需要借助futures这个crate,先在Cargo.toml里引入。
// The timer we wrote in the previous section:
use timer_future::TimerFuture;

use futures::{
    future::{BoxFuture, FutureExt},
    task::{waker_ref, ArcWake},
};
use std::{
    future::Future,
    sync::mpsc::{sync_channel, Receiver, SyncSender},
    sync::{Arc, Mutex},
    task::Context,
    time::Duration,
    thread::{ JoinHandle },
};

/// Task executor that receives tasks off of a channel and runs them.
struct Executor {
    ready_queue: Receiver<Arc<Task>>,
}

/// `Spawner` spawns new futures onto the task channel.
#[derive(Clone)]
struct Spawner {
    task_sender: SyncSender<Arc<Task>>,
}

/// A future that can reschedule itself to be polled by an `Executor`.
struct Task {
    /// In-progress future that should be pushed to completion.
    ///
    /// The `Mutex` is not necessary for correctness, since we only have
    /// one thread executing tasks at once. However, Rust isn't smart
    /// enough to know that `future` is only mutated from one thread,
    /// so we need to use the `Mutex` to prove thread-safety. A production
    /// executor would not need this, and could use `UnsafeCell` instead.
    future: Mutex<Option<BoxFuture<'static, ()>>>,

    /// Handle to place the task itself back onto the task queue.
    task_sender: SyncSender<Arc<Task>>,
}

fn new_executor_and_spawner() -> (Executor, Spawner) {
    // Maximum number of tasks to allow queueing in the channel at once.
    // This is just to make `sync_channel` happy, and wouldn't be present in
    // a real executor.
    const MAX_QUEUED_TASKS: usize = 10_000;
    let (task_sender, ready_queue) = sync_channel(MAX_QUEUED_TASKS);
    (Executor { ready_queue }, Spawner { task_sender })
}

impl Spawner {
    fn spawn(&self, future: impl Future<Output = ()> + 'static + Send) {
        let future = future.boxed();
        let task = Arc::new(Task {
            future: Mutex::new(Some(future)),
            task_sender: self.task_sender.clone(),
        });
        self.task_sender.send(task).expect("too many tasks queued");
    }
}

impl ArcWake for Task {
    fn wake_by_ref(arc_self: &Arc<Self>) {
        // Implement `wake` by sending this task back onto the task channel
        // so that it will be polled again by the executor.
        let cloned = arc_self.clone();
        arc_self
            .task_sender
            .send(cloned)
            .expect("too many tasks queued");
    }
}

impl Executor {
    fn run(&self) {
        while let Ok(task) = self.ready_queue.recv() {
            // Take the future, and if it has not yet completed (is still Some),
            // poll it in an attempt to complete it.
            let mut future_slot = task.future.lock().unwrap();
            if let Some(mut future) = future_slot.take() {
                // Create a `LocalWaker` from the task itself
                let waker = waker_ref(&task);
                let context = &mut Context::from_waker(&*waker);
                // `BoxFuture<T>` is a type alias for
                // `Pin<Box<dyn Future<Output = T> + Send + 'static>>`.
                // We can get a `Pin<&mut dyn Future + Send + 'static>`
                // from it by calling the `Pin::as_mut` method.
                if future.as_mut().poll(context).is_pending() {
                    // We're not done processing the future, so put it
                    // back in its task to be run again in the future.
                    *future_slot = Some(future);
                }
            }
        }
    }
}
这代码多看一眼就会爆炸,多学一点就会融化~
我们从上到下一点一点分析
Executor这玩意儿不用多说,就是这代码的核心。
它有一个字段ready_queue,是一个队列,它接收task也就是任务。前面有说过task是future的最外层表现,这里可以简单理解为一个task包裹一个future。
我们上面分析的执行器的作用的两点还可以理解为:执行器只是接收task,然后运行task。
那么这个queue在这里就很好解释了,另外也是能兼容同时存在多个异步的场景,单个执行器用于多个异步场景是很正常的。
至于这个Receiver是个啥,它来自std::mpsc::Receivier,上一次我们接触到std::mpsc应该是多线程那一节,创建一个“通道”也就是std::mpsc::channel,它返回一个元组:(发射器sender和接收器receiver)。所以这里的Receiver自然就是通道的receiver的接收器类型。
Spawner就不用多说了,用于发送task给Executor。
Task,它有俩字段,future就不用多了,而task_sender,它的类型和Spawner的task_sender一样,它是用来主动发送自己给执行器的,至于和Spawner的重复了,我们等下会知道。
BoxFeture来自futures这个crate,效果类似Box。
new_executor_and_spawner,看名字就知道是创建发射器和接收器。
sync_channel,看名字就知道是同步的通道,之前学的时候我们知道可以同时存在多个发射器,但是只能存在一个接收器,所以如果有多个发射器同时发送数据,对于接收器来说一般是没办法确定接收顺序的。那么这个sync_cannel自然就是用来确保接收器按顺序接收的。
然后给Spawner实现了spawn这个方法,它用来接收future,然后创建task再发送给executor。
这里就可以分析出为什么Spawner和Task要分别存放一个task_sender了,这个Spawner::spawn就是用来给这个异步流程注入动力的其中一部分:将初始数据交由执行器,这样执行器才能去触发驱动。而Task的task_sender则是等自己被唤醒之后再重新发射一次task给接收器,这样接收器就可以再次执行了。
然后是给Task实现了ArcWake这个trait,这玩意儿看名字就知道是一个waker。
也就是用来唤醒task自己的,这里就不说这个ArcWake是啥了。
接着就该轮到我们的主角Executor了,我们给它实现了一个run方法。
这个run自然就是按顺序执行这些任务了,把future从task中拿出来执行poll,如果还是is_pending,那么就塞回去。
那么这就完成了,我们来调用下。
fn main() {
    let (executor, spawner) = new_executor_and_spawner();

    // Spawn a task to print before and after waiting on a timer.
    spawner.spawn(async {
        println!("howdy!");
        // Wait for our timer future to complete after two seconds.
        TimerFuture::new(Duration::new(2, 0)).await;
        println!("done!");
    });

    // Drop the spawner so that our executor knows it is finished and won't
    // receive more incoming tasks to run.
    drop(spawner);

    // Run the executor until the task queue is empty.
    // This will print "howdy!", pause, and then print "done!".
    executor.run();
}
这没什么好说的。
我们来跑一下

其实还是有些乱的,所以咱来画张图。
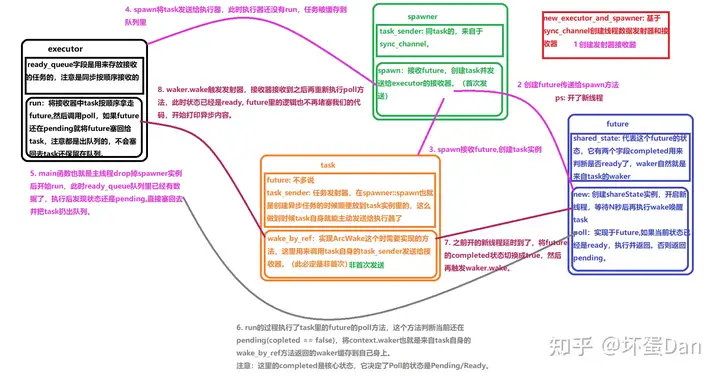
这回应该是比较清晰了(可能你看了之后更乱了?)
执行器们和系统IO#
我们在最开头说过一个socket的例子,那个例子中当数据不再是有效的之后我们的task就会停止工作,等待下一次值有效之后才会再次唤醒它。
不过这个过程中有些方法来自于socket自身,我们并不清楚它里面是怎么做的,比如set_readable_callback(wake)这一步,之前我们是自己控制的,把waker缓存到future自身上。如果我们还有特殊操作涉及到waker的,那么这就很麻烦了。
但如果让我们自己来写,我们又怎么知道什么时候数据会是有效的呢?
第一想法自然就是比较笨的做类似轮询的操作,开个新线程连续的试探。
但是这是极其不推荐的。开销蹭蹭蹭就上去了,性能刷刷刷就掉下来了。
那么还有啥办法呢?
有:IO 感知系统阻塞元件(。。这玩意儿太过专业术语IO-aware system blocking primitive)
比如Linux的epoll[7]、FreeBSD[8]/Mac OS的kqueue[9]、Windows的 IOCP[10]以及Fuchsia[11]的port S[12]。上面这些个都是可以接入到rust中的,通过mio[13]这个crate
这些元件都允许线程在多重异步IO事件中堵塞,只有这些事件中有事件变成Ready状态时才会返回一次。
那么这一点就正好填补了我们上面提到的那个问题
API们大概长下面这样
struct IoBlocker {
    /* ... */
}

struct Event {
    // An ID uniquely identifying the event that occurred and was listened for.
    id: usize,

    // A set of signals to wait for, or which occurred.
    signals: Signals,
}

impl IoBlocker {
    /// Create a new collection of asynchronous IO events to block on.
    fn new() -> Self { /* ... */ }

    /// Express an interest in a particular IO event.
    fn add_io_event_interest(
        &self,

        /// The object on which the event will occur
        io_object: &IoObject,

        /// A set of signals that may appear on the `io_object` for
        /// which an event should be triggered, paired with
        /// an ID to give to events that result from this interest.
        event: Event,
    ) { /* ... */ }

    /// Block until one of the events occurs.
    fn block(&self) -> Event { /* ... */ }
}

let mut io_blocker = IoBlocker::new();
io_blocker.add_io_event_interest(
    &socket_1,
    Event { id: 1, signals: READABLE },
);
io_blocker.add_io_event_interest(
    &socket_2,
    Event { id: 2, signals: READABLE | WRITABLE },
);
let event = io_blocker.block();

// prints e.g. "Socket 1 is now READABLE" if socket one became readable.
println!("Socket {:?} is now {:?}", event.id, event.signals); 其实socket自己的方法就是用这种方式,可以看下set_readable_callback方法的源码
impl Socket {
    fn set_readable_callback(&self, waker: Waker) {
        // `local_executor` is a reference to the local executor.
        // this could be provided at creation of the socket, but in practice
        // many executor implementations pass it down through thread local
        // storage for convenience.
        let local_executor = self.local_executor;

        // Unique ID for this IO object.
        let id = self.id;

        // Store the local waker in the executor's map so that it can be called
        // once the IO event arrives.
        local_executor.event_map.insert(id, waker);
        local_executor.add_io_event_interest(
            &self.socket_file_descriptor,
            Event { id, signals: READABLE },
        );
    }
} 将waker注册到事件中,然后等待socket有有效数据后就会去触发事件,这个过程是阻塞的。
总结#
这一节依旧是理论知识偏多,虽然可以跳过,但是还是建议先过一遍,因为它讲的是异步的执行流程和原理。
参考#
- ^executing-futures-and-tasks https://rust-lang.github.io/async-book/02_execution/01_chapter.html#under-the-hood-executing-futures-and-tasks
- ^the-future-trait https://rust-lang.github.io/async-book/02_execution/02_future.html#the-future-trait
- ^task-wakeups-with-waker https://rust-lang.github.io/async-book/02_execution/03_wakeups.html#task-wakeups-with-waker
- ^build-a-timer https://rust-lang.github.io/async-book/02_execution/03_wakeups.html#applied-build-a-timer
- ^build-an-executor https://rust-lang.github.io/async-book/02_execution/04_executor.html#applied-build-an-executor
- ^executors-and-system-IO https://rust-lang.github.io/async-book/02_execution/05_io.html#executors-and-system-io
- ^epoll https://baike.baidu.com/item/epoll/10738144
- ^FreeBSD https://www.freebsd.org/
- ^kqueue https://www.bing.com/ck/a?!&&p=0191be2242ddb028JmltdHM9MTY3NDk1MDQwMCZpZ3VpZD0yYzgxY2Y1NC1lNDBkLTYwY2EtM2YwMi1kZTk2ZTU2YjYxNzYmaW5zaWQ9NTIxNQ&ptn=3&hsh=3&fclid=2c81cf54-e40d-60ca-3f02-de96e56b6176&psq=kqueue&u=a1aHR0cHM6Ly9kZXZlbG9wZXIuYXBwbGUuY29tL2xpYnJhcnkvYXJjaGl2ZS9kb2N1bWVudGF0aW9uL1N5c3RlbS9Db25jZXB0dWFsL01hblBhZ2VzX2lQaG9uZU9TL21hbjIva3F1ZXVlLjIuaHRtbA&ntb=1
- ^IOCP https://developer.aliyun.com/article/708589
- ^Fuchsia https://fuchsia.dev/
- ^Fuchsia-port https://fuchsia.dev/fuchsia-src/reference/kernel_objects/port
- ^rust-mio https://github.com/tokio-rs/mio
编辑于 2023-01-29 22:28・IP 属地广东