
前言#
昨天我们学了操作符、控制流、函数、模块
坏蛋Dan:python简单入门--day2:运算符、控制流、函数、模块
今天我们来学数据结构
另外还是那句话,下面的内容会省略一些点,是面向有编程基础的(最好是前端)。
数据结构#
python有四种内置的数据结构,分别是list、tuple、dictionary以及set。
List#
类似前端的数组或者后端的vector,可以增删改查,即动态的。
不过这里有一点需要注意,和前端的数组类似,python中的list也是类似对象/类的存在,这个list对象的字段是i,value就是i对应的元素。
这就很符合python中万物皆对象的理念了。
不多说,直接上例子
# This is my shopping list
shoplist = ['apple', 'mango', 'carrot', 'banana']

print('I have', len(shoplist), 'items to purchase.')

print('These items are:', end=' ')
for item in shoplist:
    print(item, end=' ')

print('\nI also have to buy rice.')
shoplist.append('rice')
print('My shopping list is now', shoplist)

print('I will sort my list now')
shoplist.sort()
print('Sorted shopping list is', shoplist)

print('The first item I will buy is', shoplist[0])
olditem = shoplist[0]
del shoplist[0]
print('I bought the', olditem)
print('after del', shoplist)

shoplist.pop()
print('after pop', shoplist)

shoplist.insert(1, 'milk')
print('after insert', shoplist)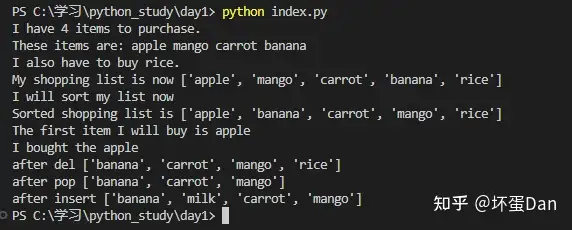
用法也几乎和js中的Array一样,不过这里需要注意,del是会直接影响到数组的长度的,这一点和js的不一样。

另外这个sort方法是基于timsort的,我之前有篇文章实现了这个timsort,是基于typescript的,感兴趣的可以去看下
Tuple#
元组这玩意儿前端只有typescript 里做了支持,一般都是后端语言有这个概念。
元组的长度是不可变的,但是它里面可以放不同类型的东西,甚至是再放一个tuple。
来看下例子
# I would recommend always using parentheses
# to indicate start and end of tuple
# even though parentheses are optional.
# Explicit is better than implicit.
zoo = ('python', 'elephant', 'penguin')
print('Number of animals in the zoo is', len(zoo))

new_zoo = 'monkey', 'camel', zoo    # parentheses not required but are a good idea
print('Number of cages in the new zoo is', len(new_zoo))
print('All animals in new zoo are', new_zoo)
print('Animals brought from old zoo are', new_zoo[2])
print('Last animal brought from old zoo is', new_zoo[2][2])
print('Number of animals in the new zoo is',
      len(new_zoo)-1+len(new_zoo[2]))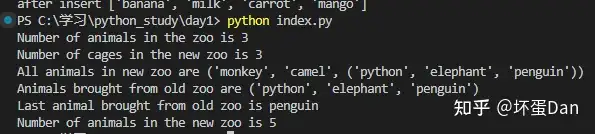
不过和List一样,Tuple也是序列(sequence),表示一系列的item。
括号可以不写,但是建议是加上。
Dectionary#
字典字如其名,类似传统的对象,但是对象这个概念已经被用了,所以换了个词。用法自然也是对象的样子,直接看例子
# 'ab' is short for 'a'ddress'b'ook

ab = {
    'Swaroop': 'swaroop@swaroopch.com',
    'Larry': 'larry@wall.org',
    'Matsumoto': 'matz@ruby-lang.org',
    'Spammer': 'spammer@hotmail.com'
}

print("Swaroop's address is", ab['Swaroop'])

# Deleting a key-value pair
del ab['Spammer']

print('\nThere are {} contacts in the address-book\n'.format(len(ab)))

for name, address in ab.items():
    print('Contact {} at {}'.format(name, address))

# Adding a key-value pair
ab['Guido'] = 'guido@python.org'

if 'Guido' in ab:
    print("\nGuido's address is", ab['Guido'])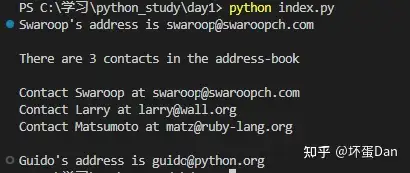
我们创建的字典都是dist类的实例/对象
另外还有一点不同:不可以使用.来访问对应的key,.在python中是用来访问对象的属性的。

Sequence#
List、Tuple以及String都是sequence, 那么这个Sequence到底是个啥呢?
最主要的特性就是membership tests(比如in或者not in表达式)以及indexing operations即索引操作,允许我们通过下标找到对应的元素。
来看个例子
shoplist = ['apple', 'mango', 'carrot', 'banana']
name = 'swaroop'

# Indexing or 'Subscription' operation #
print('Item 0 is', shoplist[0])
print('Item 1 is', shoplist[1])
print('Item 2 is', shoplist[2])
print('Item 3 is', shoplist[3])
print('Item -1 is', shoplist[-1])
print('Item -2 is', shoplist[-2])
print('Character 0 is', name[0])

# Slicing on a list #
print('Item 1 to 3 is', shoplist[1:3])
print('Item 2 to end is', shoplist[2:])
print('Item 1 to -1 is', shoplist[1:-1])
print('Item start to end is', shoplist[:])

# Slicing on a string #
print('characters 1 to 3 is', name[1:3])
print('characters 2 to end is', name[2:])
print('characters 1 to -1 is', name[1:-1])
print('characters start to end is', name[:])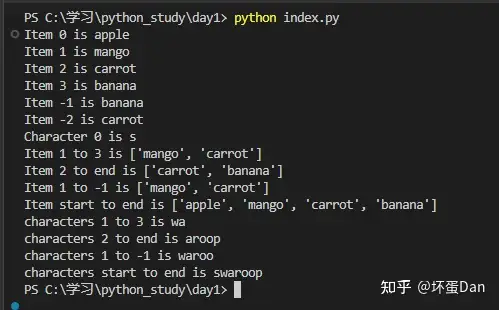
除了常规的操作外,你甚至可以传入负数,它会从length - x给你找对应的元素。
还可以做切割子序列的操作,在rust中管这叫做slice即切片。
这里还支持第三个参数,表示切片的step
>>> shoplist = ['apple', 'mango', 'carrot', 'banana']
>>> shoplist[::1]
['apple', 'mango', 'carrot', 'banana']
>>> shoplist[::2]
['apple', 'carrot']
>>> shoplist[::3]
['apple', 'banana']
>>> shoplist[::-1]
['banana', 'carrot', 'mango', 'apple']
传入负数表示倒序切
另外切片是新生成一个Sequence,而不是引用,相当于deep copy。
List、Tuple以及String都是基于Sequence的,所以它们都可以有上面的操作。
Set#
就和传统的Set一样,无序,可以去重。
>>> bri = set(['brazil', 'russia', 'india'])
>>> 'india' in bri
True
>>> 'usa' in bri
False
>>> bric = bri.copy()
>>> bric.add('china')
>>> bric.issuperset(bri)
True
>>> bri.remove('russia')
>>> bri.add('india')
>>> bri & bric # OR bri.intersection(bric)
{'brazil', 'india'}
其它不过多介绍了,到时候用多了自然就懂了。
补充下Strings#
前面说了字符串也是基于Sequence的,至于原理这里就不多说了,应该是和Rust中String为什么是一个集合的原理是差不多的。
另外字符串也是对象,它有自己的属性len和方法format等。
# This is a string object
name = 'Swaroop'

if name.startswith('Swa'):
    print('Yes, the string starts with "Swa"')

if 'a' in name:
    print('Yes, it contains the string "a"')

if name.find('war') != -1:
    print('Yes, it contains the string "war"')

delimiter = '_*_'
mylist = ['Brazil', 'Russia', 'India', 'China']
print(delimiter.join(mylist)) 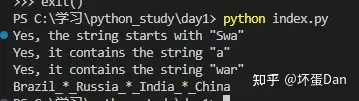
方法干的啥相信大家一眼就知道了,所以就不多说了。
例子#
那么我们这会儿学的差不多了,该搞个demo当作期中考试了。
目标#
写一个程序用来备份我们的import进来的文件。
分析#
我们现在直接上手写代码会有些无从下手的感觉。我们应该先将功能进行拆分,分为几个点来实现。
- 需要备份的文件/文件夹需要存放到一个
List里 - 需要放在主文件夹里
- 需要
zip压缩 - 备份的名字为:当前日期 + 时间
- 下载
zip这个指令(GNU/Linux/Unix自带)
安装zip(windows)#
在开始写代码之前,window用户先往这里看:http://gnuwin32.sourceforge.net/downlinks/zip.php
需要自行下载、安装zip工具才行,安装完之后还得把这个工具加到环境变量中。
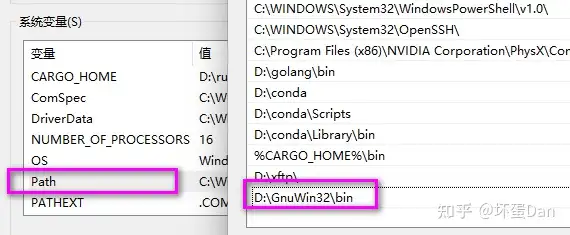
完事后新开一个终端输入zip,如果有以下显示
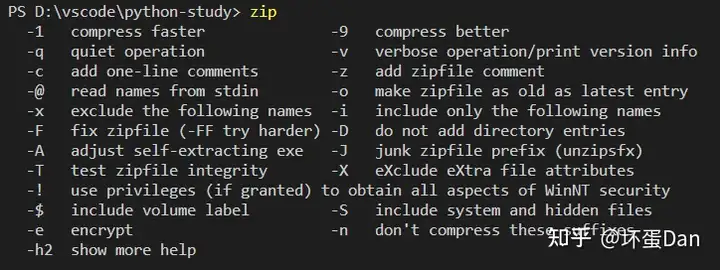
那就表示安装成功了,但是如果你输入后返回"zip不是可执行程序"。那么建议你把整个vscode重启了,或者干脆直接重启电脑。
实现#
我们重新创建一个文件,就叫backup_main.py
import os
import time

# 1. The files and directories to be backed up are
# specified in a list.
# Example on Windows:
# source = ['"C:\\My Documents"']
# Example on Mac OS X and Linux:
source = ['D:\\vscode\python-study\index.py']
# Notice we have to use double quotes inside a string
# for names with spaces in it.  We could have also used
# a raw string by writing [r'C:\My Documents'].

# 2. The backup must be stored in a
# main backup directory
# Example on Windows:
# target_dir = 'E:\\Backup'
# Example on Mac OS X and Linux:
target_dir = 'D:\\vscode\python-study'
# Remember to change this to which folder you will be using

# 3. The files are backed up into a zip file.
# 4. The name of the zip archive is the current date and time
target = target_dir + os.sep + \
         time.strftime('%Y%m%d%H%M%S') + '.zip'

# Create target directory if it is not present
if not os.path.exists(target_dir):
    os.mkdir(target_dir)  # make directory

# 5. We use the zip command to put the files in a zip archive
zip_command = 'zip -r {0} {1}'.format(target,
                                      ' '.join(source))

# Run the backup
print('Zip command is:')
print(zip_command)
print('Running:')
if os.system(zip_command) == 0:
    print('Successful backup to', target)
else:
print('Backup FAILED') 我们把同文件夹里的index.py文件作为备份对象,压缩放到当前目录下。
然后基于os.system让操作系统执行zip -r ${path} ${backup_target}
如果存放备份的文件不存在,那么这个时候就创建target文件夹。

然后我们再看到我们当前文件夹里就多了一个当前时间的zip文件了。
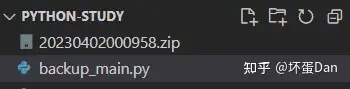
os.spe: 分隔符,在window上是\\,而在unix上则是/time.strftime: 根据传入的格式返回当前时间,至于%Y%m%d这些东西表示什么我就不多说了,大家都懂。zip -r:这里的-r表示的是recursively,是否深度处理即包含所有的子孙文件。
优化1#
我们刚实现的小工具目前是直接用当前的时间作为压缩文件的名字,我们可以优化成:当前年月日/时间 即以日期为文件夹,时间为文件名字,这样我们就可以更好的分类了。
import os
import time

# 1. The files and directories to be backed up are
# specified in a list.
# Example on Windows:
# source = ['"C:\\My Documents"']
# Example on Mac OS X and Linux:
source = ['D:\\vscode\python-study\index.py']
# Notice we have to use double quotes inside a string
# for names with spaces in it.  We could have also used
# a raw string by writing [r'C:\My Documents'].

# 2. The backup must be stored in a
# main backup directory
# Example on Windows:
# target_dir = 'E:\\Backup'
# Example on Mac OS X and Linux:
target_dir = 'D:\\vscode\python-study'
# Remember to change this to which folder you will be using
today = target_dir + os.sep + time.strftime('%Y%m%d')
# The current time is the name of the zip archive.
now = time.strftime('%H%M%S')

# The name of the zip file
target = today + os.sep + now + '.zip'

# Create target directory if it is not present
if not os.path.exists(today):
    os.mkdir(today)  # make directory

# 5. We use the zip command to put the files in a zip archive
zip_command = 'zip -r {0} {1}'.format(target,
                                      ' '.join(source))

# Run the backup
print('Zip command is:')
print(zip_command)
print('Running:')
if os.system(zip_command) == 0:
    print('Successful backup to', target)
else:
print('Backup FAILED') 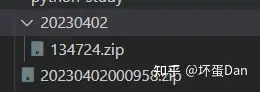
优化2#
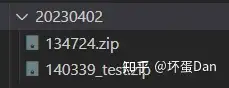
我们还可以进一步进行区分,用数字来区分虽然比较安全,但是不便于理解和阅读。
我们还可以提供一个输入入口给用户,让他们自定义文件的后缀,这样用户区分的时候会知道对应的压缩文件是用来干嘛的。
import os
import time

# 1. The files and directories to be backed up are
# specified in a list.
# Example on Windows:
# source = ['"C:\\My Documents"']
# Example on Mac OS X and Linux:
source = ['D:\\vscode\python-study\index.py']
# Notice we have to use double quotes inside a string
# for names with spaces in it.  We could have also used
# a raw string by writing [r'C:\My Documents'].

# 2. The backup must be stored in a
# main backup directory
# Example on Windows:
# target_dir = 'E:\\Backup'
# Example on Mac OS X and Linux:
target_dir = 'D:\\vscode\python-study'
# Remember to change this to which folder you will be using
today = target_dir + os.sep + time.strftime('%Y%m%d')
# The current time is the name of the zip archive.
now = time.strftime('%H%M%S')

# Take a comment from the user to
# create the name of the zip file
comment = input('Enter a comment --> ')
# Check if a comment was entered
if len(comment) == 0:
    target = today + os.sep + now + '.zip'
else:
    target = today + os.sep + now + '_' + \
        comment.replace(' ', '_') + '.zip'

# Create target directory if it is not present
if not os.path.exists(today):
    os.mkdir(today)  # make directory

# 5. We use the zip command to put the files in a zip archive
zip_command = 'zip -r {0} {1}'.format(target,
                                      ' '.join(source))

# Run the backup
print('Zip command is:')
print(zip_command)
print('Running:')
if os.system(zip_command) == 0:
    print('Successful backup to', target)
else:
print('Backup FAILED') 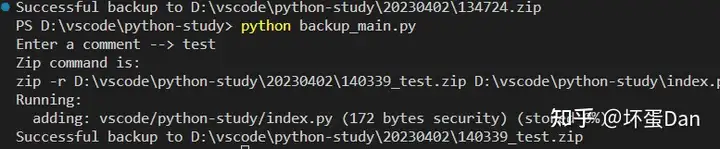
总结#
可以看到python的语法其实是比较简单的,几乎没什么很难理解的用法。
发布于 2023-04-02 17:53・IP 属地广东